
A short while ago, we looked at the Azure App Configuration Service, specifically its Feature Flag Manager, for toggling features on and off in your client-side JavaScript applications. But Azure App Configuration is more than just a feature flags manager. Today, let’s look at how we can use this same service to change the configuration values for your ASP.NET apps dynamically, without having to restart your application.
Can’t I Just Use IOptionsSnapshot and/or IOptionsMonitor?
You may be wondering why you can’t just use the IOptionsSnapshot and/or the IOptionsMonitor interfaces provided by dotnet, as they exist for this very thing – dynamically loading configuration changes into your asp.net app without having to restart your application. The answer is – yes, you can use it. In fact, that’s exactly what we’ll be using in this solution. However, using Azure App Configuration service in tandem will provide some added benefits. With Azure App Configuration:
- You don’t need to manually update any appsettings.json or similar configuration files. This will help eliminate any issues that may arise due to a typo or syntax error in your config file.
- You don’t need to do any deployments to make configuration changes. Think about the number of environments that you have in your setup – Dev? QA? UAT? Prod? You may have to go through many rounds of approval before you can take a config change up this way, through those lower non-prod environments until they make into your production instance.
- Even if you decide to bypass your CI/CD process and update a configuration file manually, that manual change will get overwritten when the next deployment is done to that environment. Moreover, your hosting situation may be one in which you don’t have backdoor access to your published files to even be able to make such a change.
- A deployment often means a restart of your application, anyway. So, this nullifies any benefit you may have achieved using IOptionsSnapshot or IOptionsMonitor, anyway.
So, Azure App Configuration not only allows you to make a configuration change without having to restart your app, but it also allows you to do so without having to deploy anything, as well.
Example App
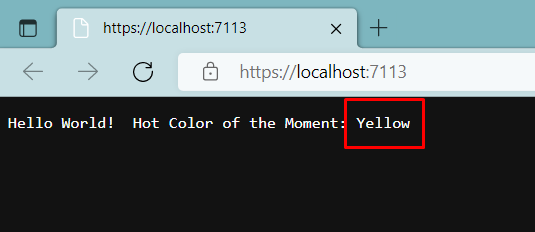
For our meditation, I have conjured up a very simple example using a web app that I bootstrapped via the CLI using dotnet new web. It’s using the minimal API design pattern that came with dotnet 6 but it will work just the same on a full-fledged Model-View-Controller (MVC) project. My example app has a single endpoint that returns a “Hello World” message along with a “Hot Color of the Moment” which is a value that it gets from the appsettings.json configuration file in the project. In this first iteration, I’m using the IOptions interface in the framework, to have dotnet take the JSON value and hydrate a C# object (HotColorOfTheMoment) of the same name.
using Microsoft.Extensions.Options;

var builder = WebApplication.CreateBuilder(args);

// Load HotColorOfTheMoment section from appsettings.json into a C# object
builder.Services.Configure<HotColorOfTheMoment>(builder.Configuration.GetSection(nameof(HotColorOfTheMoment)));
var app = builder.Build();

// Echo out the "hot color of the moment"
app.MapGet("/", (IOptions<HotColorOfTheMoment> colorConfig) => $"Hello World!  Hot Color of the Moment: {colorConfig.Value.Color}");

app.Run();

public class HotColorOfTheMoment
{
    public string Color { get; set; } = "Red";
}
My appsettings.json file looks like this:
{
  "HotColorOfTheMoment": {
    "Color": "Yellow"
  }
}
Run the app. You should see output similar to what you see in my screenshot, below.
Now, try changing the Color value that’s specified in the appsettings.json file. Save your changes and try refreshing the browser without restarting the app. No matter what changes you make, the value does not update. Now, restart the application and try again… it will now pull the latest value that you have specified in the config file.
Setup IOptionsSnapshot
To solve this first problem (of allowing config changes in your app without having to restart it), we can swap out IOptions with either IOptionsSnapshot or IOptionsMonitor interfaces provided by dotnet. You can checkout the docs to understand the differences between them but for our purposes here, either one will do. The updated code using IOptionsSnapshot looks like this (it’s literally changing IOptions to IOptionsSnapshot):
using Microsoft.Extensions.Options;

var builder = WebApplication.CreateBuilder(args);
builder.Services.Configure<HotColorOfTheMoment>(builder.Configuration.GetSection(nameof(HotColorOfTheMoment)));
var app = builder.Build();

app.MapGet("/", (IOptionsSnapshot<HotColorOfTheMoment> colorConfig) => $"Hello World!  Hot Color of the Moment: {colorConfig.Value.Color}");

app.Run();

public class HotColorOfTheMoment
{
    public string Color { get; set; } = "Red";
}
Now, try the same experiment from earlier, changing the color values in appsettings.json and refreshing the app without ever restarting the app. You’ll see that dotnet pulls in the latest value with every new request, allowing you to update them while the app is still running! That’s awesome.
However, there are a few other issues surrounding the changing of configuration that still has to be worked out. What if you don’t have direct access to the configuration files on the web servers where your app is deployed? What if you need to do a deployment to a remote environment to facilitate the changing of an appsettings.json file? Well, that’s where Azure App Configuration comes in.
Setup Azure App Configuration
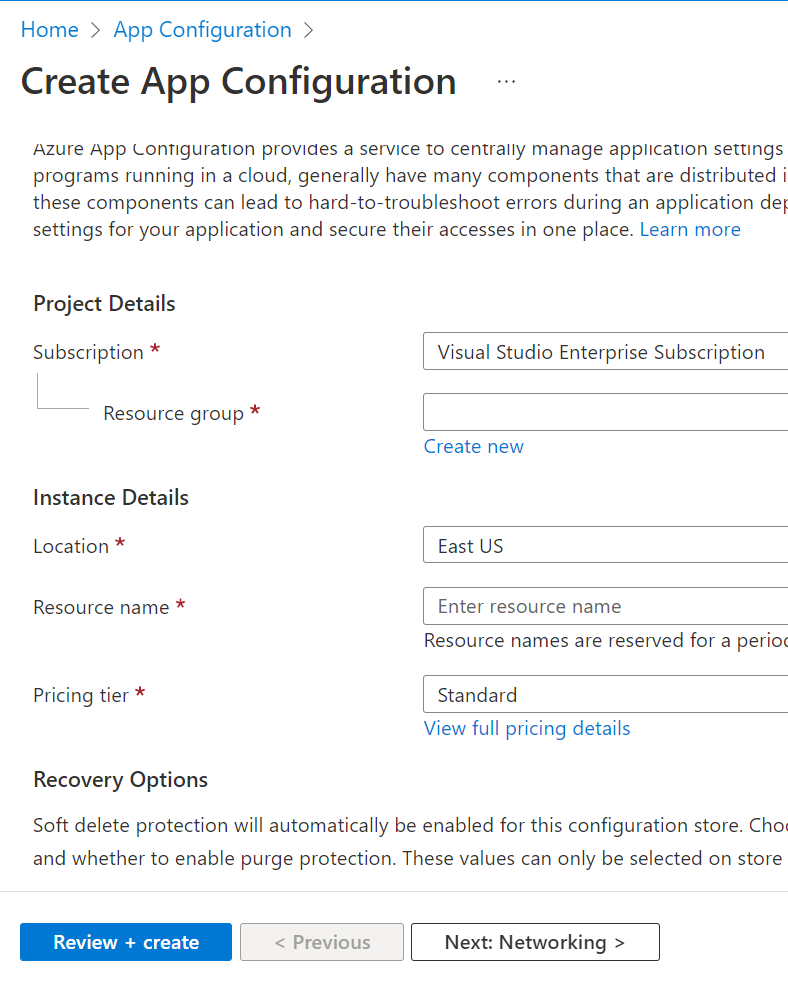
Head over to the Azure Portal and search for App Configuration. Let’s provision a new instance by providing the relevant details. This entails providing a name for your instance, the geographical region where you want this resource to be provisioned and the pricing tier that you want to go with. The service comes in two pricing tiers – a free edition and a standard edition. That’s pretty much it and is usually provisioned in a few minutes.
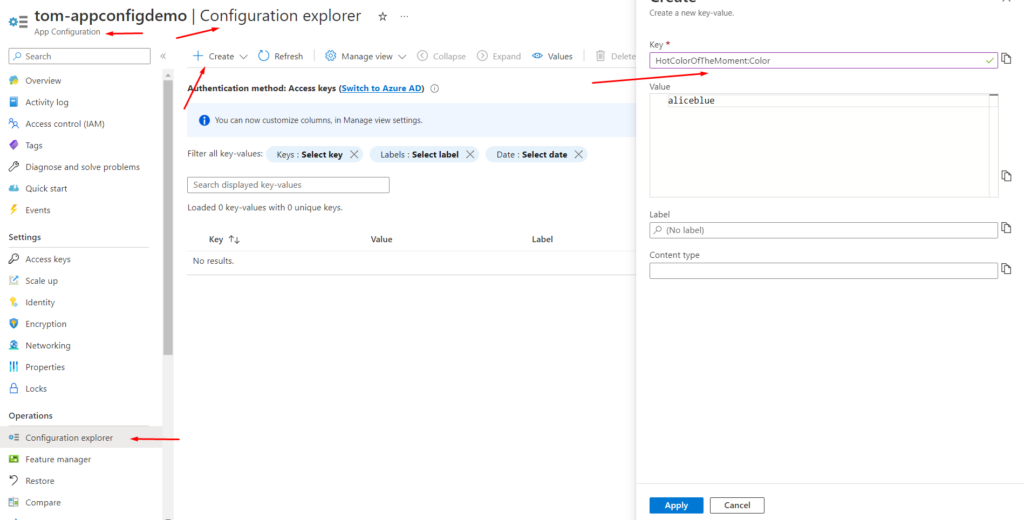
Once your App Configuration instance is ready, head over to the Configuration Explorer within it. Click on the “Create” button to create a new key/value pair. I’m going to (re)create the same one that we have specified in our local appsettings.json file and we were using in the example app thus far – HotColorOfTheMoment which bears a Color property. As this configuration is in a hierarchical structure, and App Configuration objects are a entered in flat name/value structure we must use a delimiter to denote our hierarchical structure. App Configuration understands three types of delimiters: periods, forward-slashes and colons. So I can specify my lone configuration object in one of the three following ways:
HotColorOfTheMoment:Color or HotColorOfTheMoment.Color or HotColorOfTheMoment/Color
Congratulations, you have moved your local configuration to Azure’s App Configuration. Next, let’s figure out how we can pull this into our ASP.NET application.
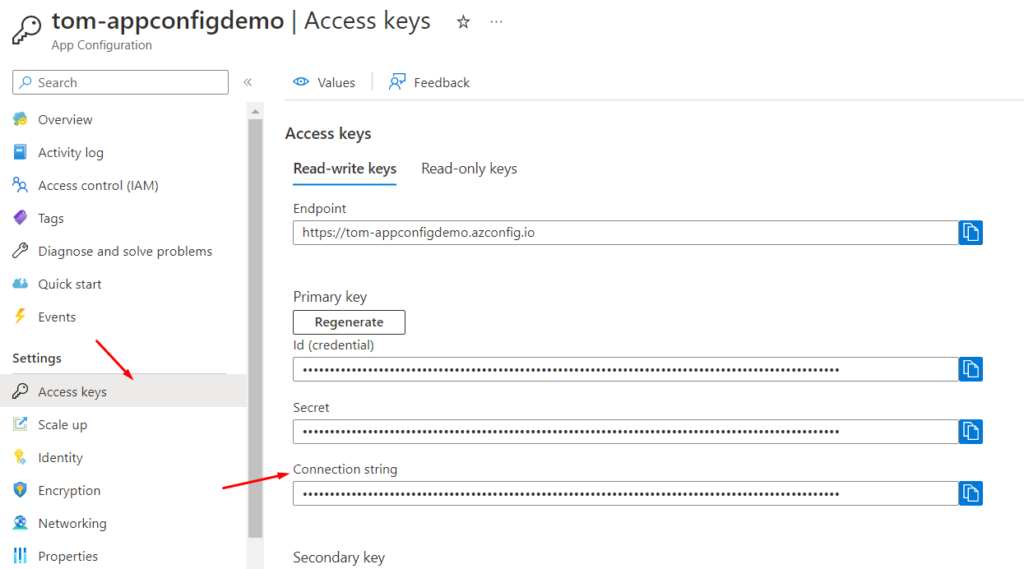
But before you leave the Azure portal, let’s take care of two additional items:
- Navigate over to the “Access Keys” blade and copy the
connection stringvalue that you see there. You’ll need this to connect to Azure App Configuration from within your ASP.NET application. - In my example, I only had a single configuration key/value pair named
HotColorOfTheMoment. However, in real life, you’ll most likely have several configuration key/value pairs for a single application. In those cases, it is a good pattern/practice to create or designate a single configuration item as a “sentinel key”. In a later step below, when you wire up Azure App Configuration within your dotnet app, you’ll see that you have to register the keys that you have stored within app configuration. It will get quite cumbersome and error-prone if you have to specify every last key in your setup. Instead, you can register a single key as a special “sentinel key” and tell your dotnet app to just monitor changes to that one key and if it detects a change there, to go ahead and refresh its local cache by pulling all the other key/value pairs from Azure. You can read more about this in the documentation, here. For this reason, I’ll add another key to the configuration named “version” and supply it the value 1. You can create your own sentinel key with whatever name and value. Whenever you update one or more of your configuration values, just update this key’s value as well. As your app is monitoring this at the interval that you’ve specified, as soon as it detects a change to it, your app will then pull down the latest values of all the key/value pairs that you have specified for your app.
Adding Azure App Configuration to Your ASP.NET Application
Now that our app configuration is stored in Azure, you can get rid of it in the local appsettings.json file. Instead, we can use that file to specify the connection string that we’ll use to connect to Azure. My updated appsettings.json file looks like this:
{
  "ConnectionStrings": {
    "AzureAppConfiguration": "the-connection-string-you-copied-from-azure-app-configuration-goes-here"
  }
}
Next, add the Microsoft.Azure.AppConfiguration.AspNetCore NuGet package to your application. This library provided by Microsoft contains the plumbing to connect to your Azure App Configuration instance and pull any configuration values that you have specified there.
Lastly, in the bootstrapping of your application, let dotnet’s configuration manager know that you want to use Azure’s App Configuration and to pull config values from there. My updated Program.cs file looks like this:
using Microsoft.Extensions.Options;

var builder = WebApplication.CreateBuilder(args);
builder.Services.AddAzureAppConfiguration();

var connectionString = builder.Configuration.GetConnectionString("AzureAppConfiguration");

builder.Host.ConfigureAppConfiguration(options =>
{
    options.AddAzureAppConfiguration(config =>
    {
        config.Connect(connectionString)
        .ConfigureRefresh(refresh =>
        {
            refresh.Register("version", refreshAll: true)
            .SetCacheExpiration(TimeSpan.FromSeconds(10));
        });
    });
});

builder.Services.Configure<HotColorOfTheMoment>(builder.Configuration.GetSection(nameof(HotColorOfTheMoment)));
var app = builder.Build();
app.UseAzureAppConfiguration();

app.MapGet("/", (IOptionsSnapshot<HotColorOfTheMoment> colorConfig) => $"Hello World!  Hot Color of the Moment: {colorConfig.Value.Color}");

app.Run();

public class HotColorOfTheMoment
{
    public string Color { get; set; } = "Red";
}
Here are the key points to note from the code above:
- I’m calling
AddAzureAppConfigurationto add App Configuration components to the service collection of my app. - I’m getting the connection string of my Azure App Configuration instance also from configuration, but from local configuration, namely from my appsettings.json file. Remember – dotnet has a layered configuration system, allowing you to specify configuration in various sources – local settings files, as environment variables, in Azure (as that is the topic of this post) and in many other locations and the framework will pull them together for use within the application.
- In
ConfigureAppConfiguration, I’m specifying the details of how Azure App Configuration is to be utilized within the app:- The
Connectmethod takes the connection string which allows my app to hit my app configuration endpoint. - I’m registering my sentinel key – “version” using the
Registermethod with therefreshAllargument set to true, denoting that whenever this particular key’s value changes, all values should be refreshed. - I’m specifying the interval at which my app should connect to Azure to check for updates using the
SetCacheExpirationmethod. The default value for this is 30 seconds. - Finally, the
UseAzureAppConfigurationcall invokes the middleware in the pipeline.
- The
Run the app. Change values in Azure portal (remembering to update your sentinel key, as well). Refresh the app and see your changes without ever restarting your app.
Closing Thoughts
Azure App Configuration provides a good, clean way to manage configuration parameters within your applications. It allows you to extract out these concerns out of your code, out of your deployment pipelines and out of custom config files that you manually have to update and instead provides you an admin dashboard where you can manage these settings with minimal risk and minimal room for error. There is a free-tier that provides you with a generous amount of usage that you can use for your personal or low-profile projects. Even the standard tier is at a relatively low price-point that may be acceptable to most users.
The companion GitHub repository for this post is located here. It contains the sample code that was shown here. However, you’ll have to setup your own Azure App Configuration instance and use your own connection string to run the app:
https://www.github.com/tvaidyan/dynamic-azure-app-configuration