
Service Cloud Voice is the voice-calling component of the omnichannel contact-center solution within the Salesforce platform.
I want to define a couple of terms in that statement before we move on:
Omnichannel: Different modes of communication such as email, chat(bot) conversations, SMS (text messaging), voice calls (which we’ll concentrate on in this post and other posts in this series) and channeling those in a holistic (rather than as silos) way so that we (or the customer) can move across those channels seamlessly without losing context.
Contact-Center: For our discussions – a system to manage all the communications between an organization and its customers. Service Cloud Voice is the component within that contact center that addresses the voice call concerns of the overall solution.
Evolution of the Call Center within the Salesforce Platform
Prior to the Service Cloud Voice product, you were able to bring in your own telephony provider and integrate it with Salesforce in such a way that it was another channel in your omnichannel solution. You still can do that. However, in June 2020, Salesforce Service Cloud Voice was made generally available (GA). This product provides a prepackaged solution, taking out the complexity of acquiring your own telephony provider and building out your call-center on it, from scratch. Salesforce teamed up with Amazon and integrated the Amazon Connect contact center into this product. When you install Service Cloud Voice, Salesforce automatically creates an Amazon AWS account, provisions the necessary resources which includes an instance of Amazon Connect (contact center), Amazon Lex (natural language processing among other things), Amazon Kinesis (data streaming), Lambda functions (serverless functions) that routes the call flow into Salesforce without you having to wire all that up, yourself. In typical Salesforce fashion, you can click a few buttons, specify a few config settings and the magic is delivered to you. But in the case of Service Cloud Voice, you are allowed to peak behind the curtain, check under the hood. Actually, from a design and management perspective, you need to. While some of the user management pieces of your call center can be managed within Salesforce itself, you need to cross over into AWS land to provision phone numbers, create call flows (IVR) and to manage the finer aspects of your call center solution.
Some Notes on Installation and Initial Setup
Please refer to the official documentation for a comprehensive understanding of how to install this product and set it up. However, I’ll roughly cover my installation and config process here and note a few specific things from my own experience that may fill some of the concept gaps that I came across when doing this on my own.
Acquisition
How do I buy this? Talk to your Salesforce rep. Once you acquire the necessary licenses, the preliminary bits will get put on your production org. But unless you’re feeling quite adventurous, create a sandbox of your production org and then first set everything up there and try it out before trying this in prod. Also, I’m assuming that you already have Service Cloud setup in your org as Service Cloud Voice is a sub-component of that.
Guided Setup Process
You can access the guided setup for Voice by going to Setup and entering “Voice” into the quick find box. From the results, select Channels > Phone > Voice > Voice Setup

Prior to turning on Service Cloud Voice, you’d have to meet a couple of prerequisites:
- You must have a Custom My Domain setup for your org. If you are accessing your Salesforce org in the form of [your-org-name].my.salesforce.com, you have this setup. If your org was created on or after Winter ’21, you’ll have this by default. You can get more information on this in the official documentation.
- Turn on Omni-Channel.
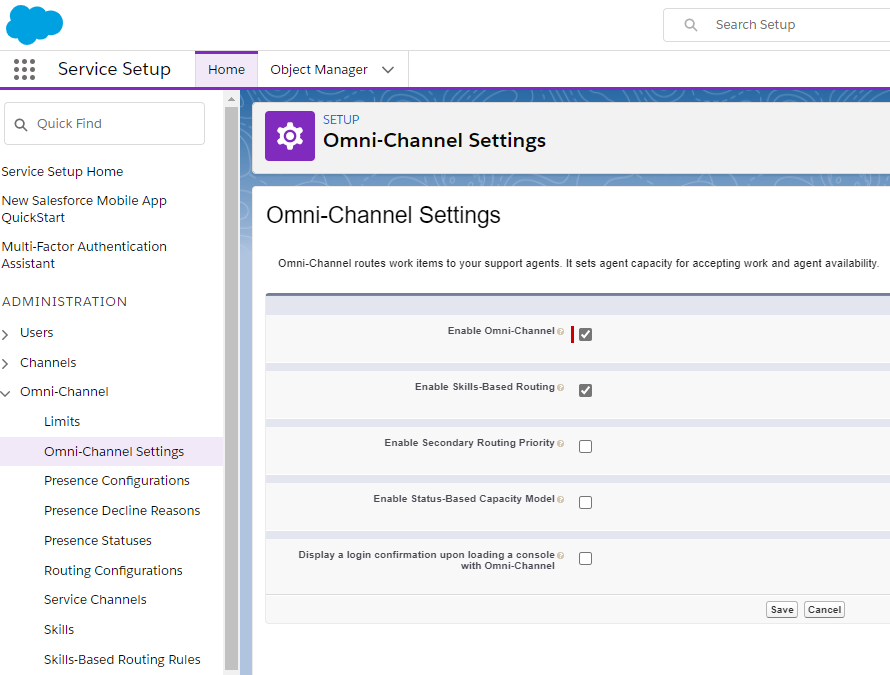
Enable Service Cloud Voice
- I got hung up a little on the wording of this Amazon AWS root email address business. Simply enter an email address that’s NOT associated with an existing Amazon AWS account. When Salesforce provisions an AWS account for you, it will tie that account to this email address. You’ll get a couple of emails from AWS during the setup process at this email address. One of them is initiating the Password Reset flow, which allows you to go setup a new password for your new Amazon AWS account, the one that Salesforce just created on your behalf, to make all this work. As I mentioned earlier, you will need to go into some AWS screens, namely Amazon Connect setting screens to manage many aspects of your call center. Also if you are concerned about the billing aspects of your new AWS account like I was, you won’t be hit up by Amazon separately but those usage charges will come through Salesforce.
- Register Tax Number. Whenever you see the words tax and IRS and all that, you get a little bit worried. At least, I do. If you are doing this in the United States, simply click the “confirm settings” button and you’re done with this step. If you are outside of the United States, you’ll have to enter you country’s tax related information. Unfortunately, I don’t have much insight into this.
Assign Contact Center Permission Sets
The setup process created two new permission sets for you – Contact Center Agent and Contact Center Admin. Assign one or more users in your org to either of these permissions sets so that you can test call center functionality with those identities.
Create a Contact Center
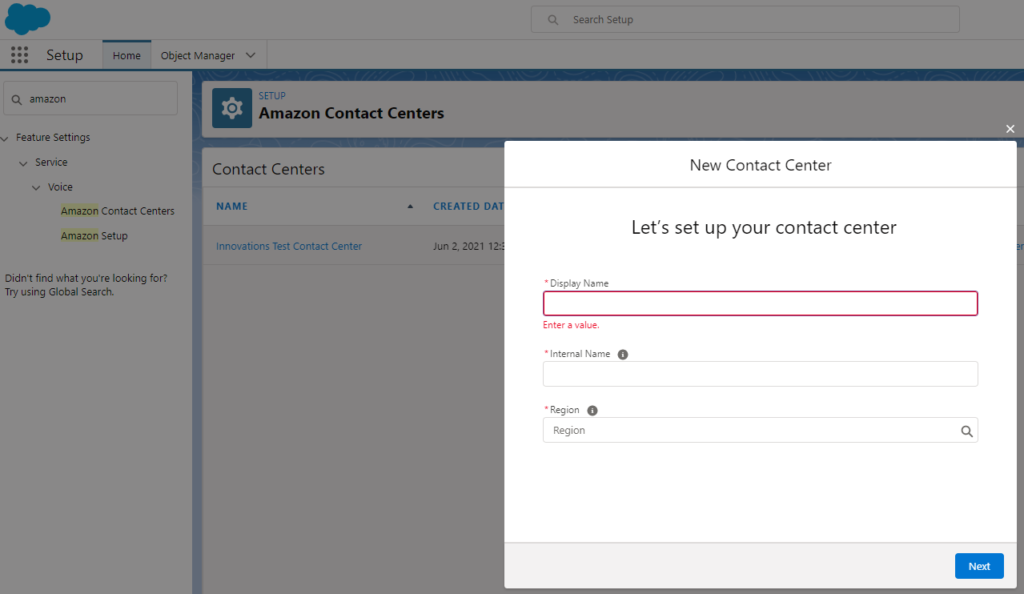
So adding a Contact Center is simply giving it a name and selecting a geographical region that’s perhaps closest to you so that you can get phone numbers in that region. Once you create this, you can add users into your call center. These users will also show up on the AWS side automatically so that you can configure things around those user accounts. After you create the Contact Center, you’ll also get a link titled “Telephony Provider Settings.” Clicking on this link will take you over to Amazon Connect and you’ll be automatically logged in to your AWS account.

Create a Voice Call Record Page
Follow the official docs on creating a Voice Call Record page. What is it? It’s a custom screen that you create with all the pertinent pieces to have a successful phone conversation with your customer. You’ll add elements such as, call-recording controls, phone controls to put yourself on mute or hold or transfer the call, live transcription of the call so that you can refer back to what you or the customer said and anything else you want on the agents screen. I made mine look more or less like the one shown in the docs and it provides a good starting point. Customize it further to meet your specific needs.
Configure Your Console App for Service Cloud Voice
This is another step that I stumbled on. It’s partly because I’m new to the Salesforce ecosystem and there were some terms that I wish I knew better. First of all, what’s a “Console App”? Well, I knew enough Salesforce lingo to understand what an App is and more specifically what a Lightning App is. Well, a further distinction is a Console app versus a Standard Navigation app. A standard navigation app shows tabs across the top while a console app shows a listing of records on one side and clicking on one will open that record in a workspace tab. Important thing to note here is that if you want to add calling features, you must do it to an existing or new Console App. The call widget (or the Omnichannel utility as it’s officially called) only works on console apps.
Go to an existing lightning app or create a new one and just include the following things in your app:
Under Utility items, pick the Omni-Channel utility and the Object-Linking Notifications utility items.
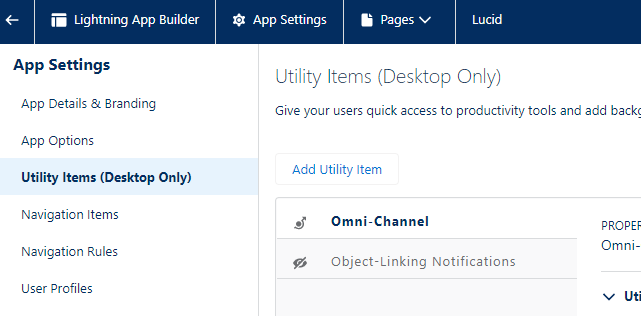
Omni-Channel is the widget that you need to dial out and make calls and also receive calls. The Object-Linking notifications widget allows you to specify how Salesforce should react when it gets a new call – should it automatically link the call to an existing contact or create a new contact? Do something else instead? You can configure those with this.
Under Navigation Items, select Voice Calls and Omni Supervisor, along with any other navigation items you have or need for your app.
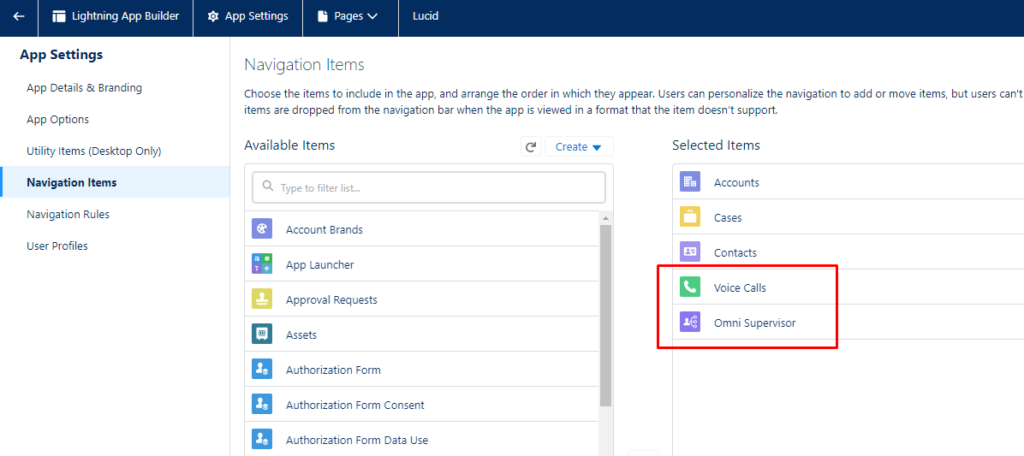
Voice Calls – This is essentially your call details record. Having easy access to it, especially when you are learning the system would be quite helpful.
Omni Supervisor – This gives you an admin utility to get a quick overall picture of the happenings in your call center, such as a list of your agents, who’s on call, who’s idle, how long the calls have been going on and so forth.
Things to Setup / Configure on the Amazon Connect Side
As per my instructions above, head on over to the Amazon Connect portal.
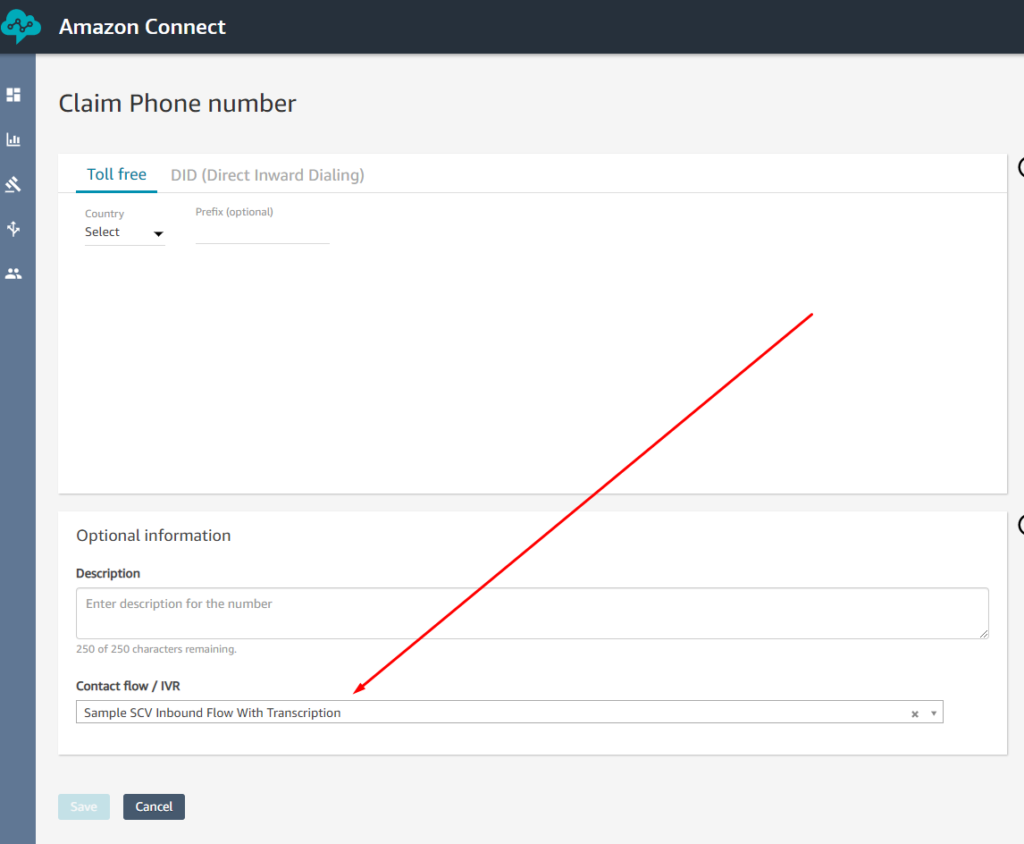
- Phone Number: Acquire a new phone number here. There is a way to port an existing number but is beyond the scope of this blog entry. You must point the phone number to a Contact Flow. For starters, pick the “Sample SCV Inbound Flow with Transcription” flow.
- Contact Flows: Don’t be overwhelmed by the number of contact flows that are already there. Actually, this is a good thing. You can clone the ones you like and customize them to fit your specific needs. Also if you open one of these up, they look super complex. But going through them systematically will give you insight into how a call comes in at the Amazon AWS side and eventually make its way into your Salesforce org.
Take a look at the Sample SCV Inbound Flow with Transcription:
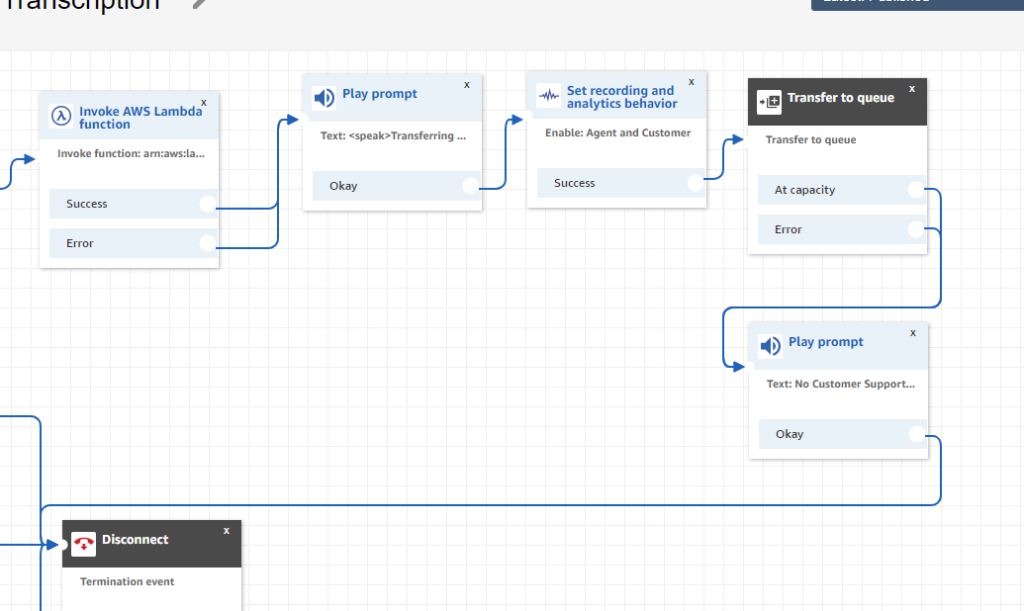
In this complex web, under the happy path, the incoming call will get transferred to a queue. This leads us to another Contact Flow labelled “Default Customer Queue”:
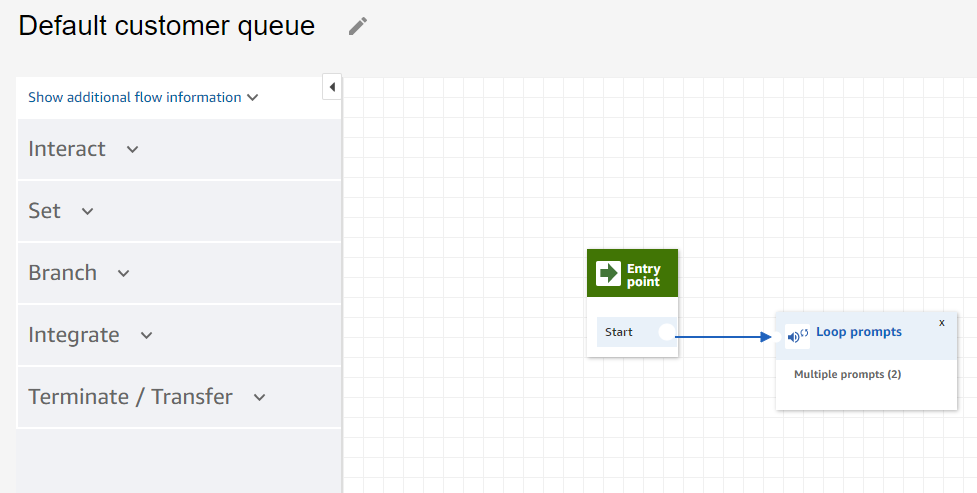
Pick up the phone and dial your number. You’ll eventually hear the prompts and hold music specified in this flow.
Picking Up and Placing Calls on the Salesforce Side
Navigate to the Lightning Console App that you added the Omnichannel utility (widget) to. You’ll see the widget in the bottom left. Change your presence to “Available for Voice”. Place an inbound call and see the screen light up. Or use the dialer here, to place an outbound call.

Additional Resources
This blog entry is not meant to be used instead of the official documentation. It documents my own experience and highlights a few things that I wish I knew, that would have saved me some time while doing this. I wish you find them helpful. Here are a few key links:
- Get Started with Service Cloud Voice – a presentation that goes over some key features and concepts: https://www.youtube.com/watch?v=rjXBVtyFqwU
- Trailhead (Salesforce’s Training Platform) Introductory Course on Service Cloud Voice: Service Cloud Voice | Salesforce Trailhead
- Service Cloud Voice Learning Map, a micro-site with links to a few resources: learnservicecloudvoice.herokuapp.com
- Official documentation for Service Cloud Voice: Service Cloud Voice (salesforce.com)