
If you work on a large development team or collaborate across multiple teams on a single application, you may come across the following situation at one time or another: feature X that has been in development is now ready to move into production. But hold on – there may be ten other features that are currently in-flight, actively being worked on, some committed in part, some in full, that are not ready to move into production. Some may have bugs in it that are currently being resolved. You can’t simply put feature X into production without contending with all these other issues.
I have been in organizations and on teams where there is a code-freeze – you tell the developers not to merge or deploy anything so that the testers can get through testing everything that’s merged in thus far and certify them so that they can be released into production. Setting aside the issues with developers now creating a backlog of unmerged code on their developer machines, there are still other issues with this approach. You may find that one of the features that made the cut for the next release has a major bug that is going to take considerable time to fix… What do you do then? Now all eyes are on that lone developer who is now under immense pressure to resolve that bug so that it can move up through the various environments and be deployed into production.
Yes, as you may have already guessed, there is an easier way.
Feature Flags / Feature Toggles
Feature flags allow you to hide features behind a toggle. An if-statement, if you will. An if-statement that you can control from outside of your deployed code, perhaps through a database table value, or an external configuration file or setting, or an external administrative application that someone can login to and turn a switch on or off. Whatever the method is, as a developer, you create this flag ahead of time and write your code in such a way that you control the visibility and/or the associated behavior based on the value of this flag.
What is LaunchDarkly?
LaunchDarkly is a fully managed, feature management solution. Through their web portal, you can create one or more feature flags representing features within your application. With these flags in place, you write your software in such a way that you control the behavior of it based on the state of the flag. You can hide and show features based on such flags.
LaunchDarkly provides several different SDKs for both client and server-side frameworks that you can easily pull into your projects. Even if an SDK that matches your framework doesn’t exist, you can go a level deeper and interface with LD’s APIs directly to interact with their service.
LaunchDarkly provides you with the concept of environments – you create as many of these as you want. Say you have four environments in your software pipeline – perhaps development, staging, demo and production. You then can create four environments in your LaunchDarkly project to match those. Once setup, you can then control the value of your feature flags for each of your environments. For instance, you may want your new feature X to be visible in development and in staging but you may want to hide it in production until the feature is fully tested and certified by your QA engineers.
Besides the SDKs and APIs and being able to light up a feature based on a remote-controlled flag, LD offers a few other more advanced scenarios that may prove beneficial for your team:
- You can run experiments with a certain segment of your users – a simple round-robin or a given percentage of your user-base.
- You can offer variants based on the logged-in user or based on a particular role or policy.
- You can get some basic reporting on the acquisition and usage of your flags.
Create a LaunchDarkly Account and Your First Feature Flag
Enough theory, let us see how this all looks in practice. If you haven’t already done so, head on over to launchdarkly.com and setup an account for yourself. As of the time of the writing of this post (July 2022), you can get yourself a 14-day trial without needing to take out a credit-card.
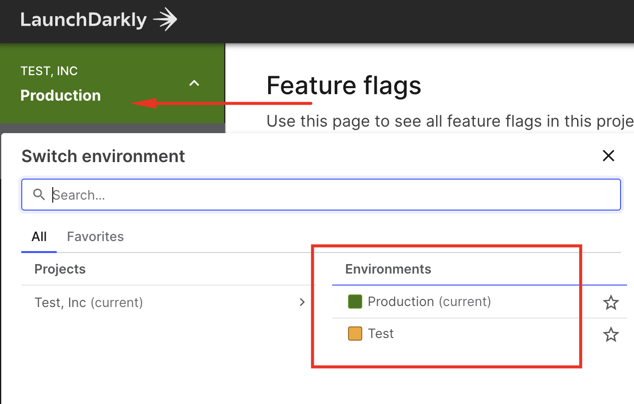
By default, you get two environments – testing and production. You can see your currently selected environment and/or change to a different environment by utilizing the top left portion of your admin panel.
Click on the “Create Flag” button to launch the create form. Provide a friendly name for your feature. The form will auto-populate a key based on that name. It is this key that you’ll use within your code to refer to this feature. Also remember to check the appropriate check-box to denote the type of SDK that you’ll be using to ask for this flag. My demo below is a Vue application and as such, I’ll be using a client-side JavaScript SDK to access this flag.
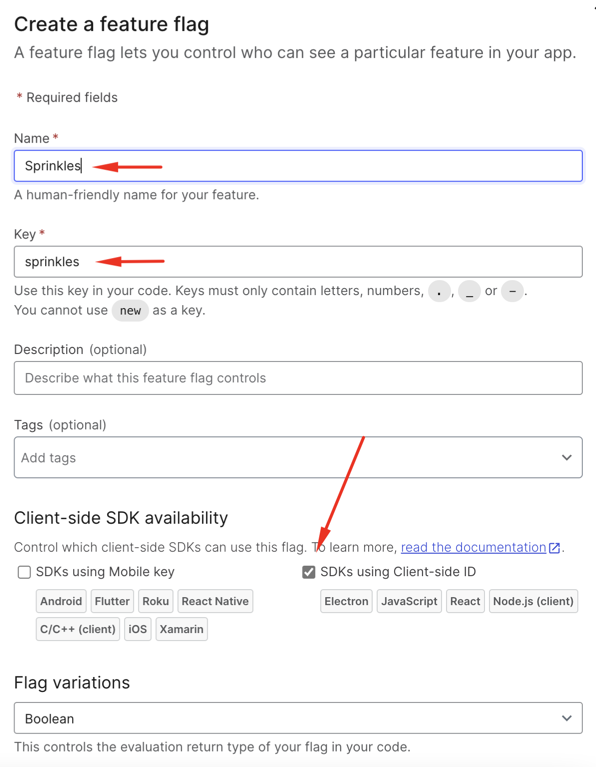
After creating a flag, next step is to connect an SDK. To connect a client-side JavaScript SDK like I’m doing in my example below, you’ll need to get your Client-side ID. You can find this value by navigating to the Account Settings, clicking on your project name. You’ll see a different key for each of your environments. Select the one that you are testing with.

Next, head on over to your application. I’m using an out-of-the box copy of a Vue 3 application that I have bootstrapped via the create-vue tool. Bring in a copy of LaunchDarkly’s JavaScript SDK by installing it via npm:
npm i launchdarkly-js-client-sdk
You can bootstrap the LaunchDarkly service by calling the init method and passing in your client-side ID. You can do so when your Vue application bootstraps, in main.js, like so:
import { createApp } from 'vue'
import App from './App.vue'

// Import LaunchDarkly's JavaScript SDK
import * as launchdarkly from 'launchdarkly-js-client-sdk';

// Initialize LaunchDarkly with your own clientside ID
let ldClient = launchdarkly.initialize('your-clientside-id-goes-here', {
    anonymous: true,
  });

// Make the LaunchDarkly client object available to your Vue components
const app = createApp(App).provide('$ldClient', ldClient).mount('#app');
Below is a component where I use one of these feature flags:
<template>
  <div>
    <h1>Hello LaunchDarkly</h1>
    <pre>{{ flags }}</pre>
    <div v-if="flags['sprinkles']">
      <img src="@/assets/sprinkles.jpg" width="300" height="400" />
    </div>
    <div v-else>
      <img src="@/assets/plain.jpg" width="300" height="400" />
    </div>
  </div>
</template>
<script>
import { ref, inject } from "vue";

export default {
  setup(props, context) {
    const $ldClient = inject("$ldClient");
    let flags = ref({});

    $ldClient.on("ready", () => {
      flags.value = $ldClient.allFlags();
    });

    $ldClient.on("change", () => {
      flags.value = $ldClient.allFlags();
    });

    return {
      flags,
    };
  },
};
</script>
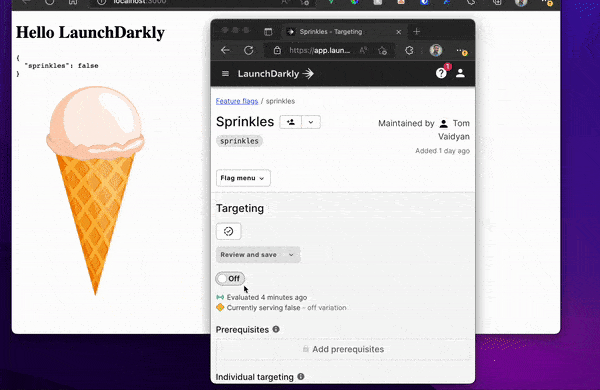
Above, I wire up event handlers for the LaunchDarkly’s “on” and “ready” events. In either case, I’m grabbing all feature flags and setting them to a local flags variable. Currently, I have a single feature flag named sprinkles. Based on the value of this flag (true or false), I either display an ice cream cone that’s plain or one with sprinkles on it.
Run the app. While it’s running, head on over to the LaunchDarkly portal and toggle the feature flag and see your app update accordingly!
Closing Remarks
Feature flagging can provide you a safety net, allowing you to work on features and merge them in, have them be deployed and available in your lower environments for testing while giving you the peace of mind that it won’t show up in production until and unless you want it to show up in production. And when you do release it in production, you can do it in a controlled manner, perhaps opening up to a small subset of users, gathering some usage metrics and verifying that things are working as expected before doing a largescale release.
You can check out my example application by cloning it from my GitHub repo, here:
tvaidyan/launchdarkly-demo: A companion repo to my blog article entitled “Feature Flags in Vue with LaunchDarkly” (github.com)
Of course, you’ll need your own LaunchDarkly account and client-side ID to make it all work. They do have a free-trial so head on over to their website and create a trial account and take my test application for a spin.