
In our last episode, we got an introduction to WebJobs in Azure App Service. Today, let’s roll up our sleeves and create our first WebJob. WebJobs are suited for any long-running background tasks that do not typically follow the request/response pattern of a typical web application. For example, you may have a website that allows your users to upload images. You may want to resize these images into various sizes or do some other image processing on them. These tasks may require longer processing times that you don’t want a user to wait around for but can be done asynchronously and be made available to the user at a later point in time. WebJobs would be a good candidate for this.
The Scenario
Today, we’ll look at the mechanics of creating a WebJob in Azure using a C# application. In this example scenario, we’ll have our WebJob open up some text files from an Azure Blob container, process the enclosed data and generate a whole another set of new files based on the originals. To keep this tutorial focused and short, I won’t go through the steps of setting up a blob container or the details of file processing. The tutorial will walk you through setting up the Web Job in Azure App Service and have it automatically run on a set interval.
The Application
My example application is a simple C# console application. You can develop such an application in Visual Studio, VSCode or another IDE or editor of your choice. The logic of my app is contained within the Program.cs file, the main entry point of my app.
using Azure.Storage.Blobs;
using Azure.Storage.Blobs.Models;

internal class Program
{
    static async Task Main(string[] args)
    {
        Console.WriteLine("Connecting to Azure Blob Storage...");

        // Get a connection string to our Azure Storage account.
	// NOTE: This is just a demo.  Don't store your connection string in code for real use.  Pull it at runtime from configuration.
        var connectionString = "your-azure-storage-account-connection-string";
        var containerName = "container-webjobs";

        // Create a BlobServiceClient object which will be used to create a container client
        BlobServiceClient blobServiceClient = new BlobServiceClient(connectionString);

        // Create a blob container client
        BlobContainerClient containerClient = blobServiceClient.GetBlobContainerClient(containerName);

        // List all blobs in the container
        await foreach (BlobItem blobItem in containerClient.GetBlobsAsync())
        {
            if (Path.GetExtension(blobItem.Name) == ".txt")
            {
                Console.WriteLine($"Processing {blobItem.Name}");

                // Create a new blob client to upload new file with ".xyz" extension
                string newBlobName = Path.ChangeExtension(blobItem.Name, ".xyz");
                BlobClient newBlobClient = containerClient.GetBlobClient(newBlobName);

                // Check if .xyz file already exists, if so, skip it.
                if (await newBlobClient.ExistsAsync())
                {
                    Console.WriteLine($"{newBlobName} already exists. Skipping...");
                    continue;
                }

                // Download the blob to a MemoryStream
                BlobClient blobClient = containerClient.GetBlobClient(blobItem.Name);
                MemoryStream memoryStream = new MemoryStream();
                await blobClient.DownloadToAsync(memoryStream);
                memoryStream.Position = 0; // Reset the stream position

                // Read the blob content
                using (StreamReader reader = new StreamReader(memoryStream))
                {
                    string content = await reader.ReadToEndAsync();

                    // Write to new blob
                    using (MemoryStream newMemoryStream = new MemoryStream())
                    using (StreamWriter writer = new StreamWriter(newMemoryStream))
                    {
                        await writer.WriteAsync(content);
                        await writer.FlushAsync();
                        newMemoryStream.Position = 0;
                        await newBlobClient.UploadAsync(newMemoryStream, true);
                    }

                    Console.WriteLine($"Saved as {newBlobName}.");
                }
            }
        }
    }
}
Above, you’ll find my rather contrived example of an application. The code above connects to an Azure Blob Storage container, loops through any .txt files and checks to see if a .xyz file exist of the same name. If not, it will open the txt file, read the contents of it and saves a new .xyz copy of the file. Like I mentioned earlier, what this particular example app is doing is not as important as how we’ll trigger this app is a WebJob.
Publish Your WebJob
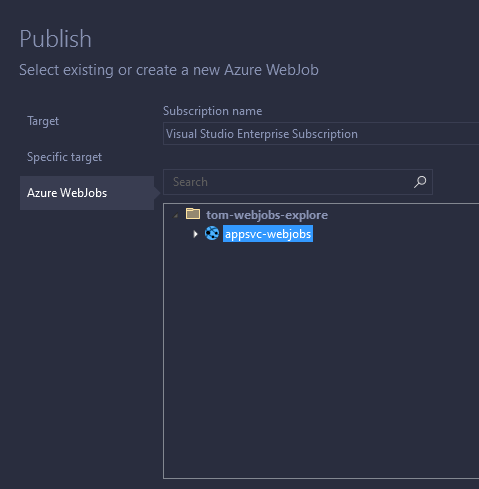
If you’re using Visual Studio, Microsoft makes the job of publishing an app as a WebJob quite trivial. From within Visual Studio, you can simply right-click on your project and select the “Publish…” option. Next, select “Azure” as your destination. When you choose Azure, you’ll see that you get an option to publish this app as a WebJob.

Next, select an existing App Service instance or create a new one, to serve as the host of your WebJob.
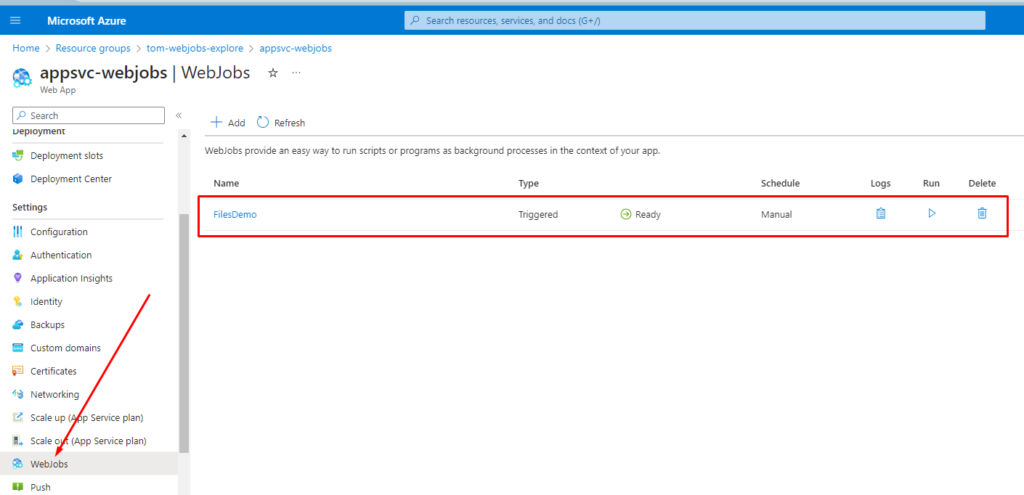
Click “next” and then “Finish” to publish your application to Azure. You can verify that the publish succeeded by logging into the Azure Portal, navigating to your App Service and selecting the WebJobs blade.
Automation
In the above exercise, you may have noticed that our application has simply appeared in Azure App Service but it has to be manually triggered to run. How do you configure it so that it runs automatically? You have a few options here:
- There are two types of WebJobs –
Continuousandtriggered. You can write your application in such a way that it is continuously running – an endless loop of sorts, with continuous processing. When publishing, you can change the WebJob type in the publish settings window or in the underlying publish profile file.
- If you don’t want to make any changes to your application code, you have other options. You can keep the WebJob type as
triggered. Then, you can specify a schedule, in the CRON expression format, within the Settings.job file that gets added to your project. When you open this file, you can see some commented out examples within it. Set the one that’s appropriate for your use-case and re-publish.
{
  //    Examples:

  //    Runs every minute
  //    "schedule": "0 * * * * *"

  // Runs every 15 minutes
  "schedule": "0 */15 * * * *"

  //    Runs every hour (i.e. whenever the count of minutes is 0)
  //    "schedule": "0 0 * * * *"

  //    Runs every hour from 9 AM to 5 PM
  //    "schedule": "0 0 9-17 * * *"

  //    Runs at 9:30 AM every day
  //    "schedule": "0 30 9 * * *"

  //    Runs at 9:30 AM every week day
  //    "schedule": "0 30 9 * * 1-5"
}
You can verify that your schedule is setup by revisiting the Azure Portal.

But I’m not a Visual Studio User
If you’re not a Visual Studio User, you can still publish a WebJob with relative ease. Simply navigate to the Azure Portal, to your App Service and the WebJobs blade and simply click on the “Add” button to add a new Web Job.
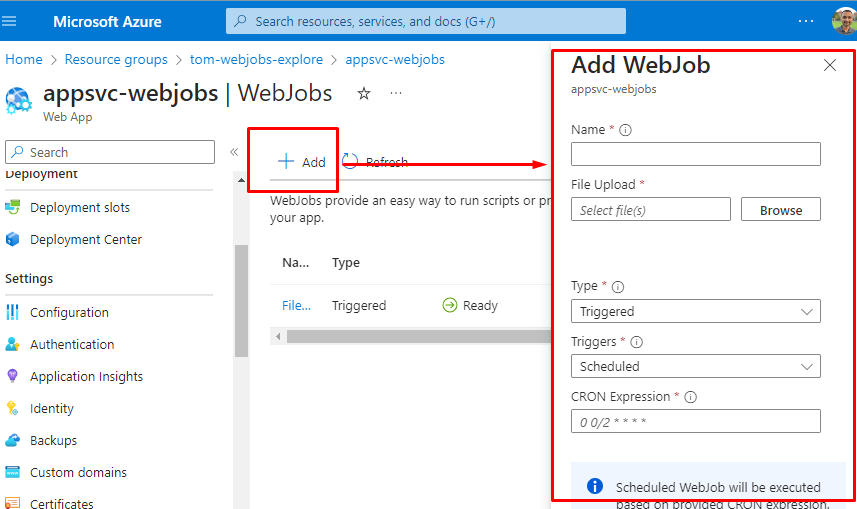
From within this dialog, you can upload an executable file of your choice, set the WebJob type and set a schedule to automatically run your application.
Conclusion
Today we looked at the steps in setting up a WebJob in Azure App Service using some C# code. You can also apply the same principles to automate and incorporate batch files, PowerShell scripts, PHP, Python and Node applications into your web application workflow.