
Hello World in Kubernetes
In Part 1 of this series, we got an introduction to Kubernetes. If you’re brand new to Kubernetes, I’d encourage you to check out that short post. We looked at some of the terminology and concepts associated with this technology. Now, let’s get our hands dirty by deploying a simple “Hello World” application on a Kubernetes cluster, running locally, on our developer machine.
Install Kubernetes
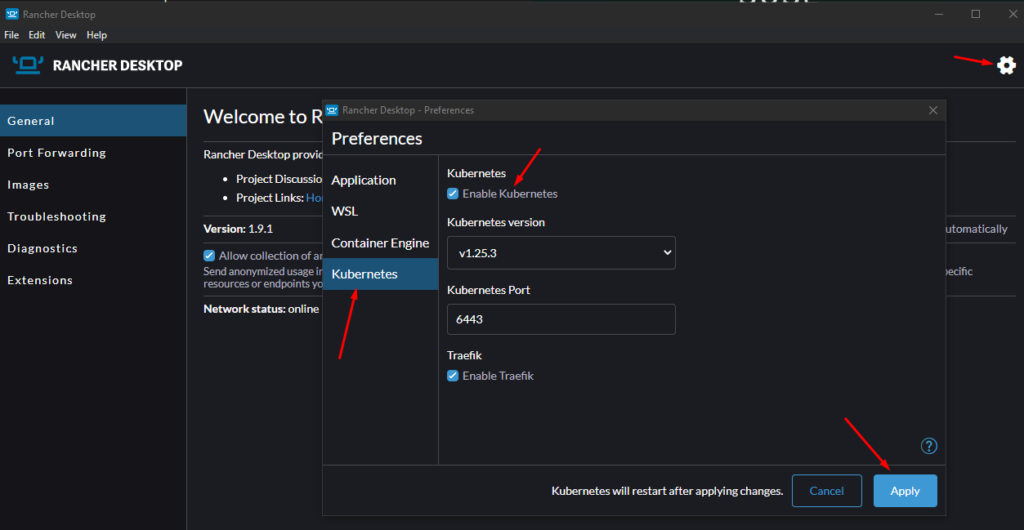
There are a couple of easy methods of getting access to Kubernetes on your local machine. One way is to install Docker Desktop and then enable Kubernetes. Alternatively, you can install Rancher Desktop, a fully open-source solution with no licensing restrictions whatsoever (at the time of this writing, January 2024). Once installed, open up the settings menu, navigate to the Kubernetes blade and “Enable Kubernetes”, if it is not already enabled.
Verify Kubernetes Cluster
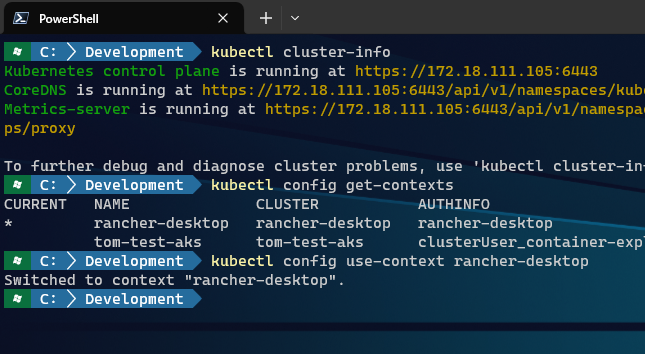
Open a command prompt and run kubectl cluster-info to see if Kubernetes is up and running. If you get results that you didn’t expect, use the kubectl get-contexts command to see if you have multiple contexts setup. You can use the kubectl use-context command to change the context to the one you’re interested in using.
Create a Hello World Docker Image
If you have a docker image ready for this exercise, please feel free to use it. If not, don’t worry, we’ll create a Hello World application and docker image, really quickly.
Create a Simple Web Application
- Create a new folder named
hello-k8s - Inside this folder, create an
index.htmlfile with the following content:
<html>
<body>
	<h1>Hello, Kubernetes!</h1>
</body>
</html>
Create a Dockerfile with the following content:
FROM nginx:alpine
COPY index.html /usr/share/nginx/html/index.html
Build the Docker Image
- Open a command prompt and navigate to the
hello-k8sfolder. - Run the following command:
docker build -t hello-k8s .
This command builds a Docker image named hello-k8s using the Dockerfile.
Push to Docker Hub
Now that we’ve built our Docker image, we want to push it to Docker hub, a repository of docker images. This is just one of the repositories that are available for use. Azure, AWS and others also have provisions to store your docker images. If you have another such area to push images to, please feel free to use that. If you’re new to all this, please follow along and I’ll show you how to push your image to Docker hub. First, set up a free account with Docker. Make a note of the username and password you use as you’ll need these later.
- Before pushing the image, you need to tag it with your Docker Hub username and the name of the repository you want to push it to.
- Use the following command:
docker tag hello-k8s [YourDockerHubUsername]/hello-k8s - Login to Docker hub:
docker login - Once logged in, and the image tagged, push the image to Docker Hub:
docker push [YourDockerHubUsername]/hello-k8s
Deploy the Application to Kubernetes
Create a Deployment
- Create a file named
hello-deployment.yamlwith the following content:
apiVersion: apps/v1
kind: Deployment
metadata:
  name: hello-world
spec:
  replicas: 2
  selector:
    matchLabels:
      app: hello-world
  template:
    metadata:
      labels:
        app: hello-world
    spec:
      containers:
      - name: hello-world
        image: [YourDockerHubUsername]/hello-k8s
        ports:
        - containerPort: 80
- Apply the deployment using:
kubectl apply -f hello-deployment.yaml
Create a Service
When running Kubernetes locally, particularly on Docker Desktop, you won’t have a LoadBalancer that automatically assigns an external IP address like you would in a cloud environment. However, you can still access your application using NodePort or port forwarding. We’re going to setup a NodePort service to gain access into our application hosted in Kubernetes. Create a hello-service.yaml with the following contents:
apiVersion: v1
kind: Service
metadata:
  name: hello-service
spec:
  type: NodePort
  selector:
    app: hello-world
  ports:
    - port: 80
      targetPort: 80
      nodePort: 30007  # Optional: Kubernetes will allocate one if not specified
Apply your changes by kubectl apply -f hello-service.yaml. Verify by running kubectl get services to find the allocated NodePort for your service. It will be listed under the PORT(S) column, something like 80:30007/TCP.
Access Your Application
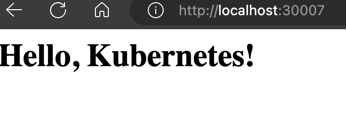
- Open your browser and navigate to
http://localhost:30007. You should see your “Hello, Kubernetes” page.
Closing Remarks
Congratulations! You’ve deployed a “Hello World” application on a local Kubernetes cluster. This exercise utilized some of the concepts that we learned in the last episode such as deployments and services. In the next installment, we’ll dig deeper, exploring more complex deployments and managing strategies. Stay tuned.