
Scaling and Managing Workloads in Kubernetes
In this continuation of our Kubernetes blog series, we delve into scaling and managing workloads in Kubernetes. If you haven’t already done so, you can check out the previous articles in this series via the links below:
Scaling applications is a key feature of Kubernetes, ensuring that your applications can handle varying loads efficiently. We’ll explore both manual and automatic scaling using the same deployment that we worked on in the previous episode.
Here’s that deployment file in its entirety, for your quick reference:
apiVersion: apps/v1
kind: Deployment
metadata:
  name: hello-world
spec:
  replicas: 2
  selector:
    matchLabels:
      app: hello-world
  template:
    metadata:
      labels:
        app: hello-world
    spec:
      containers:
      - name: hello-world
        image: [YourDockerHubUsername]/hello-k8s
        ports:
        - containerPort: 80
In this spec, you’ll notice that we asked Kubernetes to setup two replicas of our appliation. You can verify this by running kubectl get pods in your terminal.

Manual Scaling
First, let’s scale our application manually. In order to do so, run the following command in the terminal:
kubectl scale deployment/hello-world --replicas=5Next, verify the update to your deployment:
kubectl get deployment hello-worldDid Kubernetes react accordingly? Try running another kubectl get pods command:
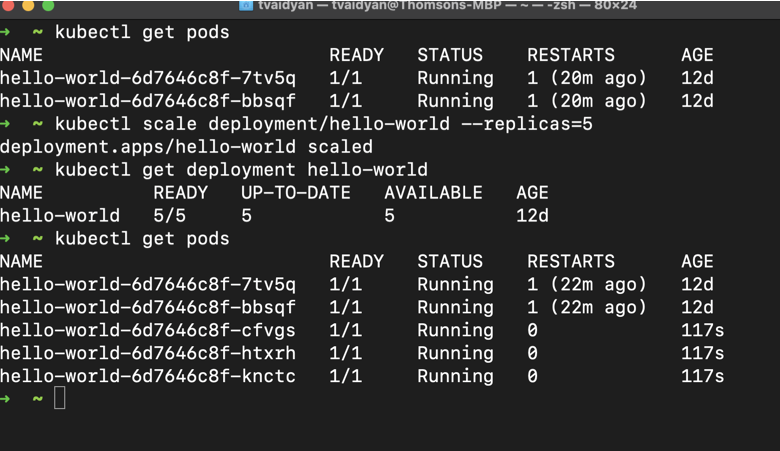
Awesome! We now have five replicas of our hello-world app running! You can probably start to appreciate the power of Kubernetes now. With a few simple commands we were able to scale up our application to service more traffic.
Auto-Scaling with Horizontal Pod Autoscaler (HPA)
While adding and removing replicas manually is impressive, we can do a lot more. Automatic scaling in Kubernetes can be achieved with the Horizontal Pod Autoscaler (HPA). We can configure this to automatically scale up or down based on select metrics such as CPU utilization or memory used. Let’s try this out.
First, we need a tool to collect various metrics from our resources to pass to the Autoscaler so that it can add or remove replicas as our configurations dictate. This tool is aptly called the Kubernetes Metric Server. To install this tool in our local Kubernetes cluster, let’s grab a yaml manifest from their GitHub Repo, here. However, instead of directly applying this template from the GitHub repo, let’s download it and make an adjustment to get it working in our local environment. Here are the contents of that manifest file, below:
apiVersion: v1
kind: ServiceAccount
metadata:
  labels:
    k8s-app: metrics-server
  name: metrics-server
  namespace: kube-system
---
apiVersion: rbac.authorization.k8s.io/v1
kind: ClusterRole
metadata:
  labels:
    k8s-app: metrics-server
    rbac.authorization.k8s.io/aggregate-to-admin: "true"
    rbac.authorization.k8s.io/aggregate-to-edit: "true"
    rbac.authorization.k8s.io/aggregate-to-view: "true"
  name: system:aggregated-metrics-reader
rules:
- apiGroups:
  - metrics.k8s.io
  resources:
  - pods
  - nodes
  verbs:
  - get
  - list
  - watch
---
apiVersion: rbac.authorization.k8s.io/v1
kind: ClusterRole
metadata:
  labels:
    k8s-app: metrics-server
  name: system:metrics-server
rules:
- apiGroups:
  - ""
  resources:
  - nodes/metrics
  verbs:
  - get
- apiGroups:
  - ""
  resources:
  - pods
  - nodes
  verbs:
  - get
  - list
  - watch
---
apiVersion: rbac.authorization.k8s.io/v1
kind: RoleBinding
metadata:
  labels:
    k8s-app: metrics-server
  name: metrics-server-auth-reader
  namespace: kube-system
roleRef:
  apiGroup: rbac.authorization.k8s.io
  kind: Role
  name: extension-apiserver-authentication-reader
subjects:
- kind: ServiceAccount
  name: metrics-server
  namespace: kube-system
---
apiVersion: rbac.authorization.k8s.io/v1
kind: ClusterRoleBinding
metadata:
  labels:
    k8s-app: metrics-server
  name: metrics-server:system:auth-delegator
roleRef:
  apiGroup: rbac.authorization.k8s.io
  kind: ClusterRole
  name: system:auth-delegator
subjects:
- kind: ServiceAccount
  name: metrics-server
  namespace: kube-system
---
apiVersion: rbac.authorization.k8s.io/v1
kind: ClusterRoleBinding
metadata:
  labels:
    k8s-app: metrics-server
  name: system:metrics-server
roleRef:
  apiGroup: rbac.authorization.k8s.io
  kind: ClusterRole
  name: system:metrics-server
subjects:
- kind: ServiceAccount
  name: metrics-server
  namespace: kube-system
---
apiVersion: v1
kind: Service
metadata:
  labels:
    k8s-app: metrics-server
  name: metrics-server
  namespace: kube-system
spec:
  ports:
  - name: https
    port: 443
    protocol: TCP
    targetPort: https
  selector:
    k8s-app: metrics-server
---
apiVersion: apps/v1
kind: Deployment
metadata:
  labels:
    k8s-app: metrics-server
  name: metrics-server
  namespace: kube-system
spec:
  selector:
    matchLabels:
      k8s-app: metrics-server
  strategy:
    rollingUpdate:
      maxUnavailable: 0
  template:
    metadata:
      labels:
        k8s-app: metrics-server
    spec:
      containers:
      - args:
        - --cert-dir=/tmp
        - --secure-port=4443
        - --kubelet-preferred-address-types=InternalIP,ExternalIP,Hostname
        - --kubelet-use-node-status-port
        - --metric-resolution=15s
        - --kubelet-insecure-tls # Adding this to ignore certificate errors for local explorations.  Do not do this in prod.
        image: registry.k8s.io/metrics-server/metrics-server:v0.6.4
        imagePullPolicy: IfNotPresent
        livenessProbe:
          failureThreshold: 3
          httpGet:
            path: /livez
            port: https
            scheme: HTTPS
          periodSeconds: 10
        name: metrics-server
        ports:
        - containerPort: 4443
          name: https
          protocol: TCP
        readinessProbe:
          failureThreshold: 3
          httpGet:
            path: /readyz
            port: https
            scheme: HTTPS
          initialDelaySeconds: 20
          periodSeconds: 10
        resources:
          requests:
            cpu: 100m
            memory: 200Mi
        securityContext:
          allowPrivilegeEscalation: false
          readOnlyRootFilesystem: true
          runAsNonRoot: true
          runAsUser: 1000
        volumeMounts:
        - mountPath: /tmp
          name: tmp-dir
      nodeSelector:
        kubernetes.io/os: linux
      priorityClassName: system-cluster-critical
      serviceAccountName: metrics-server
      volumes:
      - emptyDir: {}
        name: tmp-dir
---
apiVersion: apiregistration.k8s.io/v1
kind: APIService
metadata:
  labels:
    k8s-app: metrics-server
  name: v1beta1.metrics.k8s.io
spec:
  group: metrics.k8s.io
  groupPriorityMinimum: 100
  insecureSkipTLSVerify: true
  service:
    name: metrics-server
    namespace: kube-system
  version: v1beta1
  versionPriority: 100
The one adjustment that I made to the YAML manifest above is to add an additional argument to the metrics server container spec, kubelet-insecure-tls. This configuration will instruct the metrics server to not bother checking the validity of the TLS certificates provided by the Kubelets. In production usage, you’ll be using certificates from a proper certificate authority but for the purposes of this simple demo and our learning, we’ll bypass it.
Save the above file as metrics.yaml and apply the configuration.
kubectl apply -f metrics.yamlYou can verify your installation with the following command:
kubectl get deployment metrics-server -n kube-systemNext, we’ll make a Horizontal Pod Autoscaler (HPA) resource. Create a new yaml file named hello-world-hpa.yaml and add the following contents to it and save.
apiVersion: autoscaling/v1
kind: HorizontalPodAutoscaler
metadata:
  name: hello-world-hpa
spec:
  scaleTargetRef:
    apiVersion: apps/v1
    kind: Deployment
    name: hello-world
  minReplicas: 2
  maxReplicas: 10
  targetCPUUtilizationPercentage: 50
In the manifest above, we’re instructing Kubernetes to provision a Horizontal Pod Autoscaler and target the hello-world application (the deployment of it to be more precise) that we created and deployed in our previous session. The targetCPUUtilizationPercentage of 50 instructs the HPA to scale out more resources when our pods cross the 50% CPU utilization mark of what each pod is allowed to use. Well, home much CPU and memory can our hello-world app use? What is that set to? We haven’t done that yet and will get to that in a sec. First, let’s create our HPA.
Setup the HPA by issuing the following command: kubectl apply -f hello-world-hpa.yaml .
Remember the deployment that we did in part 2 of this series (hello-deployment.yaml)? Let’s reopen that manifest file and add the following configurations to it.
apiVersion: apps/v1
kind: Deployment
metadata:
  name: hello-world
spec:
  replicas: 2
  selector:
    matchLabels:
      app: hello-world
  template:
    metadata:
      labels:
        app: hello-world
    spec:
      containers:
      - name: hello-world
        image: tvaidyan/hello-k8s
        ports:
        - containerPort: 80
        resources:
          requests:
            cpu: 10m
            memory: 5Mi
Here, we’re specifying that our hello-world containers can use up to 10m (10 millicores) of CPU resources and 5Mi (memibytes) of RAM. Let’s apply these changes.
kubectl apply -f hello-deployment.yamlWith these configurations in place, let’s test out our auto-scaling. To test, we can generate some artificial load against our containers by creating a busy pod:
kubectl run -i --tty load-generator --image=busybox /bin/shInside the shell of the busy pod, run:
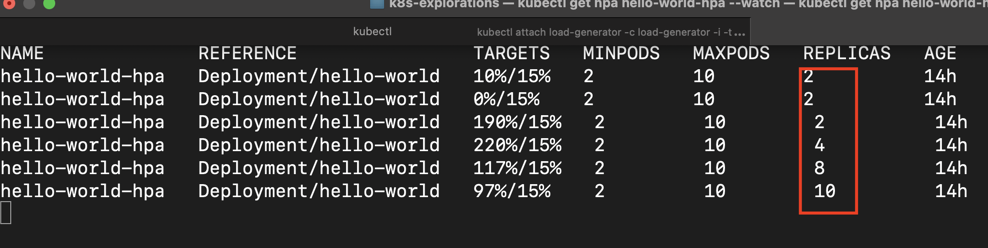
while true; do wget -q -O- http://hello-world-deployment; doneHere we’re creating an endless loop to keep requesting our hello-world app. While that’s running, open a new terminal window and issue the following command to monitor the auto-scaling:
kubectl get hpa hello-world-hpa --watchYou should see the number of replicas automatically increase as the load goes up.
Conclusion
Congratulations! You have successfully learned how to manually and automatically scale applications in Kubernetes. This knowledge is crucial for managing the performance and efficiency of your applications in a Kubernetes environment.
In our next articles, we will explore other advanced Kubernetes features and practices. Stay tuned!