
If you are looking for good patterns to do integration tests in dotnet, you should definitely consider testcontainers-dotnet. This library allows you to programmatically (using C# code) create, configure and run docker containers, along with associated docker networks and volumes and tear them down via code, as well. Why would you want to do this? It provides a good way to integration test your application. You can build up your infrastructure – your database, any other supporting tools and services in the form of docker containers, allowing you to run automated tests against them and then dispose them, all within C# and dotnet!
Integration Testing – A Background and Level Set
I realize that Integration Testing means different things to different people. For the purposes of this article, it refers to exercising your dotnet Web APIs while including a test version of your data persistence layer – a database of some sort – in those tests. Many developers consider integration tests to be the best kind of tests as they often offer the biggest bang for the buck. It often covers a large swath of your app setup and thus serves as a good indicator of the overall health of your application.
However, it becomes hard to maintain as there are a lot of complexities associated with them. The database is usually a point of such complexity. Ideally, you want to run each test in your testing suite, independently and in full isolation. For each test, you need to setup the database with the correct test data that is needed for that particular test. You need to reset that state to then run your next test. In practice, that setup often gets quite cumbersome. Some devs try to be clever and run the tests in a particular sequence. This never ends well as you are now stuck running them serially instead of in parallel, causing long running times. Moreover, as more and more features get added to the application, you are always adjusting your tests as things will inevitably have to get re-sequenced to fit the new things. To avoid this mess, ideally, you’ll want a fresh database for every single test that you can run in isolation without having to rely on or have knowledge of any other test in your suite.
Can’t we just use an in-memory provider instead?
If you are using Entity Framework, you may be familiar with their in-memory provider. Or the SQLite provider. Both these approaches are not fool proof as they don’t provide hundred percent parity with your production database. For instance, the in-memory SQL database that EF provides doesn’t account for referential integrity. If your application code has a bug that causes primary key / foreign key relationship violations, it won’t get picked up in your tests but will fail when running against your real database. Similarly, SQLite only provides a very limited feature-set when compared to a real SQL Server.
Docker, on the other hand provides you the real thing, whether that’s a SQL Server, a Redis Cache, a MySQL database or Postgres or Mongo or something else. And with the Testcontainers NuGet package, you can do this directly in your dotnet code!
Hello World with Testcontainers
For this demo, I’m using two dotnet projects that I’ve new’d up using the CLI – a webapi project and a classlib project. I’ve added the testcontainers package to the class library project using the command dotnet add package testcontainers. I’ll also bring the xUnit testing library. Although we won’t get to writing some real integration tests till the next episode, I want to lay the groundwork for it, here.
dotnet add xunit
dotnet add xunit.runner.visualstudio
dotnet add Microsoft.NET.Test.Sdk
Next, I want to create a container using some C# code. You can use any docker image name you like. I’m using the “getting started” docker image provided by Docker. The code looks something like this.
using DotNet.Testcontainers.Builders;
using DotNet.Testcontainers.Containers;
using Xunit;

namespace hello_testcontainers.tests;
public class HelloWorldTestcontainers
{
    [Fact]
    public async Task HelloTestcontainersAsync()
    {
        var gettingStartedContainerBuilder = new TestcontainersBuilder<TestcontainersContainer>()
            .WithImage("docker/getting-started")
            .WithName("HelloWorld");

        await using var test = gettingStartedContainerBuilder.Build();
        await test.StartAsync();
        var x = 1; // Just to add a breakpoint here, to pause execution
    }
}
Now, to verify that the container gets created and run, add a breakpoint on the last line of the method (var x = 1) and run your debugger. When the breakpoint gets hit, take a look at your containers list in Docker desktop or on the command line.

And there you have it – your docker container that was generated via your C# code! You may also see a second container prefixed “testcontainers-ryuk”. This is an administrative container that’s spun up by the library to keep track of the containers it generates and to remove them as they are disposed of, in code.
WebApplicationFactory for API Testing
If you’re entirely new to the world of integration testing in dotnet web applications, you’ll also want to take a look at WebApplicationFactory. This is a mechanism provided by the dotnet framework itself for the very purpose of executing your dotnet web APIs in memory, directly from within your own code.
Let’s look at how we can call the sample GET Weather API endpoint (in WeatherForecastController.cs) that got added to our project from the webapi template. First, to get access to the WebApplicationFactory, add the following NuGet package: Microsoft.AspNetCore.Mvc.Testing. Next, you need to adjust your Program.cs in your API project to make it accessible to your Tests project. These days, the Program class is marked with an “Internal” access modifier which makes it inaccessible to your Tests project. Secondly, due to the newish (dotnet 6) top level statements, you can’t even see this access modifier definition in the Program.cs file as it is implicit. But you can get past these issues by adding this to the bottom of your Program.cs file.
public partial class Program { }
With that in place, write the following code to create an in-memory web client from which you can call the weather API.
[Fact]
public async Task HelloWeatherApi()
{
var factory = new WebApplicationFactory<Program>();
var client = factory.CreateClient();
var response = await client.GetAsync("weatherforecast");
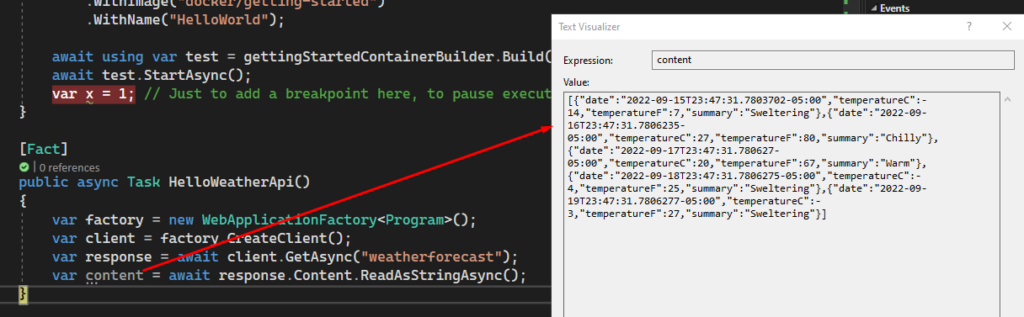
var content = await response.Content.ReadAsStringAsync();
}
Add a breakpoint to the end of the method and debug. You should see output similar to the one shown below.
Closing Remarks
In the next installment, we’ll put the pieces that we got introduced to here (namely Testcontainers and WebApplicationFactory) together to create an actual integration test. Stay tuned.
You can clone my companion GitHub repo for the code examples from this article, here: