
In today’s cloud-based landscape, it’s more important than ever to ensure that your applications are communicating securely and efficiently. One common challenge is enabling communication between an App Service instance and an Azure SQL database without exposing sensitive information, such as passwords. In today’s post, we’ll explore how Azure Managed Identity can help you overcome this challenge by providing a secure and convenient way to authenticate your App Service instances without using passwords. By using Managed Identity, you can improve the security of your communication between App Service and Azure SQL, while also simplifying the authentication process.
Turn on System Assigned Managed Identity in App Service
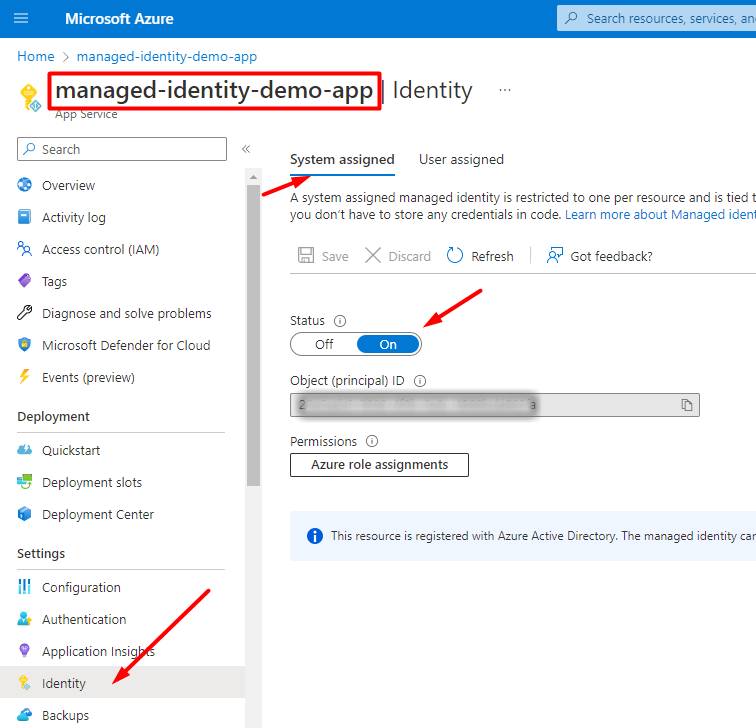
The first step in this process is to navigate to the App Service instance that you want to enable this feature on. Under the Settings section, click on the “Identity” menu item. You’ll see two tabs appear: System assigned and User assigned. You can use either one for this purpose. If you use “system assigned,” it will have the same lifecycle as the app service, i.e., if/when you remove the instance, the system assigned managed identity will go with it. Once on this tab, you’ll simply have to turn the status on. Make a note of your App Service’s exact name. You’ll need it for the next step.
Add Managed Identity User to the Database
Next, you’ll need to add this managed identity user to your Azure SQL database. Open up SSMS, Azure Data Studio or your favorite query/statement authoring tool and run the following command under the context of the particular database that you have connected to the above App Service.
CREATE USER [your-app-service-name] FROM EXTERNAL PROVIDER
Azure SQL will go and find the associated service principal from the associated Azure Active Directory and add the necessary reference for this identity to connect to the database. We’ll also need to assign the necessary permissions for this identity as to what actions it can take against the database. For example:
ALTER ROLE db_datareader ADD MEMBER [your-app-service-name];
ALTER ROLE db_datawriter ADD MEMBER [your-app-service-name];
Update Your Connection String
With those updates, you’re ready to get rid of the SQL Server username and password from your connection string. Your new connection string should look something like:
Server=your-azure-sql-server;Database=your-databse;Authentication=Active Directory Default;
Notice that it doesn’t have a username or password listed anywhere? Instead, there is an Authentication attribute that’s set to the value of Active Directory Default. You can learn more about using Azure Active Directory authentication with SqlClient from Microsoft’s documentation.
Closing Remarks
One additional thing to keep in mind: if you’re using the older System.Data.SqlClient library, this new mode of authentication will not work for you. You’ll have to start using the newer Microsoft.Data.SqlClient library instead.
Having one fewer password to keep track of is a big win in my book. Azure provides this elegant way of connecting these systems together without having to worry about tucking away that username and password from prying eyes.