
Last week, we tangentially looked at Azure Cognitive Services, as we were working through a demo of Azure Functions. If you haven’t read that post yet, you can read it here. In that demo, I showed you an example of an Azure Function that uses Cognitive Services to convert a string of text into speech (audio). That’s just barely scratching the many capabilities of Cognitive Services. It’s a powerful AI toolkit, which does language translation, image recognition, sentiment analysis (is my customer yelling at me or singing my praises?) and many other functions. Best of all, you don’t have to be a data scientist to use its capabilities. Its APIs are very approachable for the average developer and allow you to fill your apps with rich features with not much effort. In this post, I want to formally introduce you to this powerful service from Azure.
Set Up Your Azure Cognitive Services Account
Assuming you have an Azure account, you can create a new Cognitive Services resource from the Azure portal. Search for and select “Cognitive Services” from the main search. Once you’re on the landing page, you can choose to either create an account for a particular service that you’re interested in or create a “multi-purpose” account that will give you the credentials to access any of the services under the Cognitive Services umbrella. However, keep in mind that not all regions have all the various services available and you must select a specific region when creating your account.
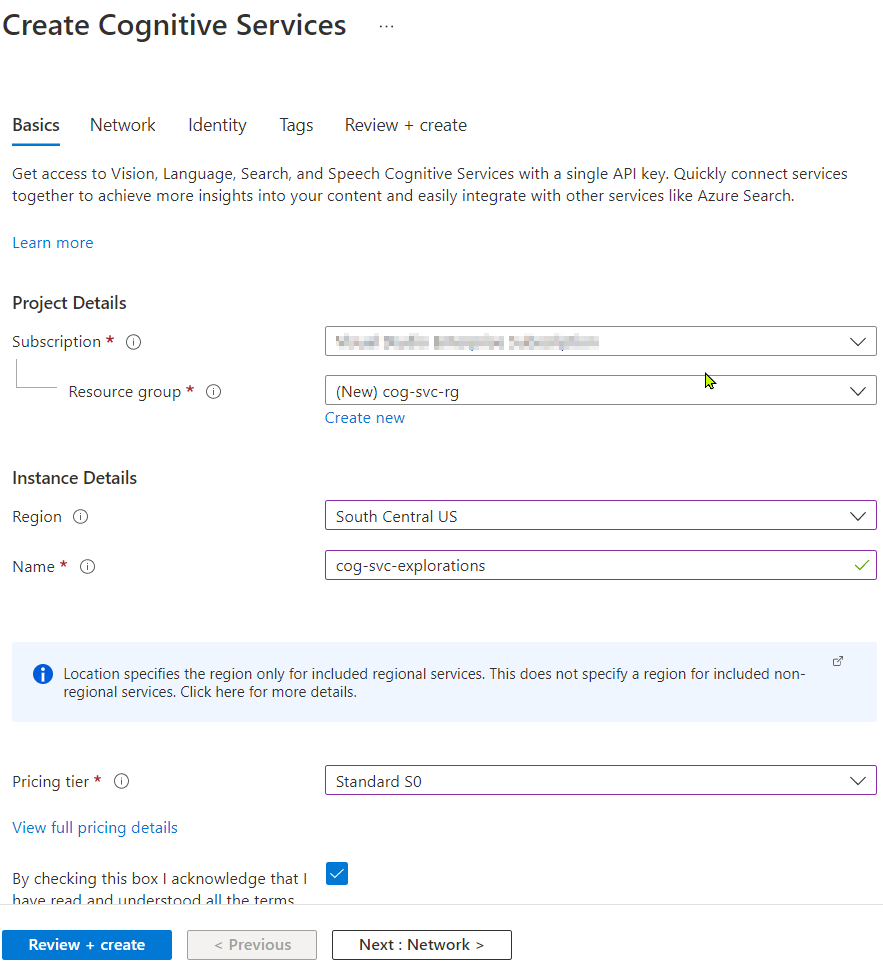
Below, you’ll see the account creation screen when going with the “multi-purpose” account. Similar to how you create any other resource in Azure, it asks you to specify a subscription (if you have multiple), a resource group (or have it create a new one), the region (I specified South Central US as it had the most coverage of services at the time of this writing) and a name to uniquely identify my account, within my subscription. It also asks you to select a pricing tier however, the only option I received was a “Standard S0” option.
Once you make your selections and hit “Create”, your account is usually provision in a few seconds. Navigate to the new resource that was just created. It will display the endpoint that you must make your API calls against and also the keys that you can use for authentication. Remember to keep your key secure and rotate them regularly to minimize the risk of unauthorized use.
Cognitive Service Offerings
The Cognitive Service umbrella covers a vast expanse of offerings providing a rich set of capabilities. Furthermore, that list is continually growing. For instance, the new Azure OpenAI Service has landed in a limited preview capacity offering the popular GPT-3 model that powers ChatGPT and DALL-E-2, two AI applications that has taken the world by storm. There are many more:
- Anomaly Detector: Detect unusual patterns or anomalies in data. This can be useful for tasks such as detecting fraudulent transactions, unusual network activity, equipment malfunctions.
- Computer Vision: Analyze images and extract information from them. This can be useful for tasks such as automatic photos tagging, inappropriate content detection, or creating image captions.
- Content Moderator: Automatically identify and moderate inappropriate or harmful content. This can be useful for tasks such as moderating user-generated content on social media platforms or websites.
- Custom Vision: Use Custom Vision to create custom image recognition models to meet your specific needs. This can be useful for tasks such as recognizing specific products or identifying unique features in images.
- Face API: Use Face API to detect and analyze human faces in images. This can be useful for identifying individuals and/or emotions.
- Language Understanding (LUIS): Use LUIS to build natural language processing models that can understand and interpret user input. This can be useful for tasks such as building chatbots or voice assistants.
- Personalizer: Build personalized experiences for users based on their preferences and past interactions. This can be useful for tasks such as recommending products or content.
- QnA Maker: Use QnA Maker to build Wiki or FAQ.
- Speaker Recognition: Identify specific people from audio. This can be useful in video-conferencing applications or transcription services.
- Speech Services: Use Speech Services to transcribe, translate, and synthesize speech. We saw an example of this in my previous post where I was able to convert some text content into audio. We can also extract text from speech using this service.
- Translator: Use Translator to translate text from one language to another.
Demo Time
For this vast service of services, a simple demo will never do its justice. They are all quite varied. Nevertheless, I’ll show you how you can make a quick REST API call against the Translator service to translate some text from one language to another.
Fire up Postman or Insomnia or another REST API client of choice. Let’s make a POST Request to https://api.cognitive.microsofttranslator.com/translate.
Add the following three parameters:
- from:
en(The source text we provide, for this demonstration, will be in English. Click here to see all the language codes that the API recognizes). - to:
es(We expect to receive the translation in Spanish). - api-version:
3.0
With the addition of these parameters, your request URL should look like this: https://api.cognitive.microsofttranslator.com/translate?from=en&to=es&api-version=3.0
Next are the required headers:
- Ocp-Apim-Subscription-Key: the value should be the API key for your account. You can get this from the portal.
- Ocp-Apim-Subscription-Region: this information is also provided in the Azure portal, along with your key.
- Content-Type:
application/json.
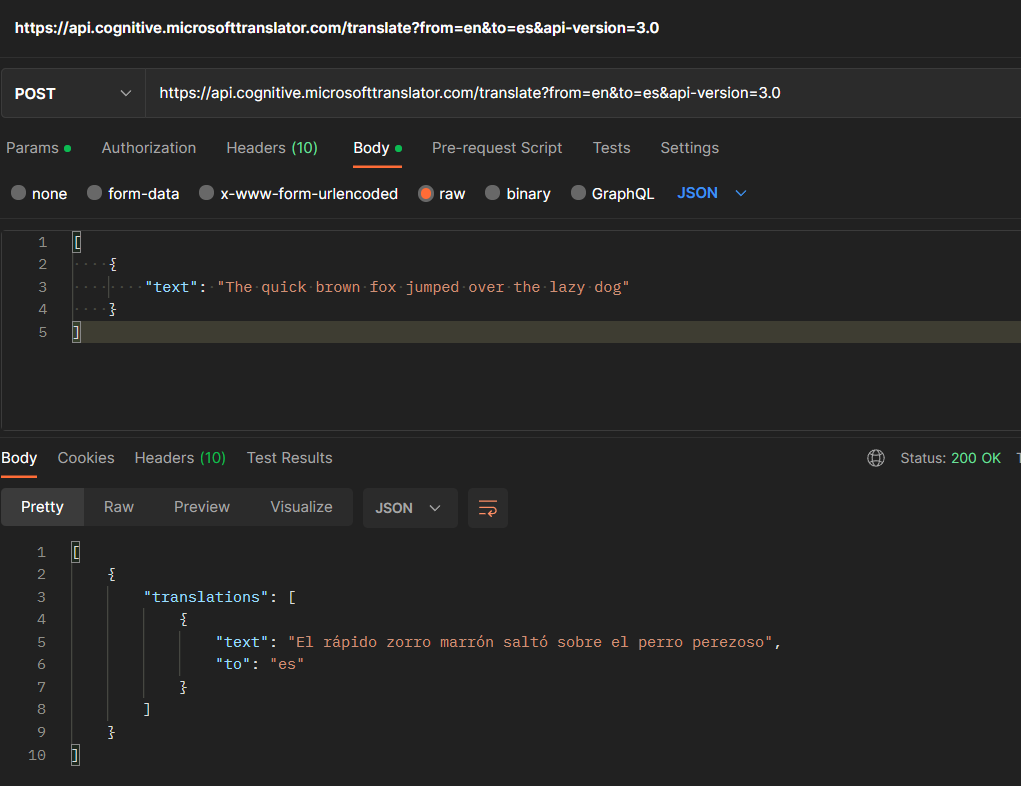
Finally, supply the text that you want translated. You can provide an array of text strings, for translation. We’ll keep it simple and provide a single string. like so:
[
    {
        "text": "The quick brown fox jumped over the lazy dog"
    }
]
Now that we have the headers, parameters and body in place, fire off your request. Here’s a sample request/response that I did in Postman:
Note that I’ve demoed a REST API call for the sake of simplicity. There are various SDKs that are available that will provide higher-level access without you having to craft each HTTP request from scratch.
Closing Remarks
Azure Cognitive Services is a valuable toolkit for developers looking to add intelligent features to their projects with minimal effort. With the ability to incorporate capabilities such as text to speech, language translation, and sentiment analysis, Cognitive Services can help you build innovative and engaging applications.
I hope this blog post provided a useful introduction to Azure Cognitive Services and gave you some ideas on how to use it in your own projects. For more information and resources about Cognitive Services, be sure to check out the Azure documentation and the Cognitive Services website.