
Have you come across a situation where you need to quickly standup a web endpoint, or a handler of sorts that can respond to some sort of an event? Perhaps you want to handle an incoming HTTP request. Or may be you want to run a small piece of code on a schedule. If you’re on Azure, you should certainly consider Azure Functions for such tasks. It supports a lot of popular languages – JavaScript, Java, Python, TypeScript, F#, PowerShell and of course, C#. Let’s explore the basics of Azure Functions and how to create and deploy your own functions using .NET.
Serverless Computing
When learning about Azure Functions (or Lambda Functions if you’re on Amazon AWS; or Google Cloud Functions, if you’re on GCP), sooner or later, you’ll come across the industry buzz word: serverless computing. It sounds magical on some marketing literature but rest assured, the servers are definitely there. However, in this cloud computing model, servers and all the related underlying architecture is abstracted away from the user, leaving you to worry about just your piece of code. And the perfect use-case for these are really just pieces of code… not complete applications… think a single function or a couple of related functions. Perhaps it’s creating thumbnails for an image; or converting some text into speech (audio); doing some calculations and updating a database; generating a report. The Azure Functions platform provides you an execution environment that scales automatically to meet the demands of your workload.
Getting Started with Azure Functions
Assuming you have an Azure account, you can create a new Function App from the Azure portal. Search for and select “Function App” from the main search. Click on the Create button to begin the function app creation process. Select a subscription and a resource group, and provide a name for your app. Choose the “code” publishing option and select .NET for the runtime stack. At the time of this writing, .NET 6 is the current LTS version and that’s what I’m using for this demo. Select a region that’s geographically close to you. I’m going with the Windows operating system and going with the Consumption (serverless) plan type but feel free to chose one of the other options that you may find more preferable to you. Any option will really suffice for this getting started demo.
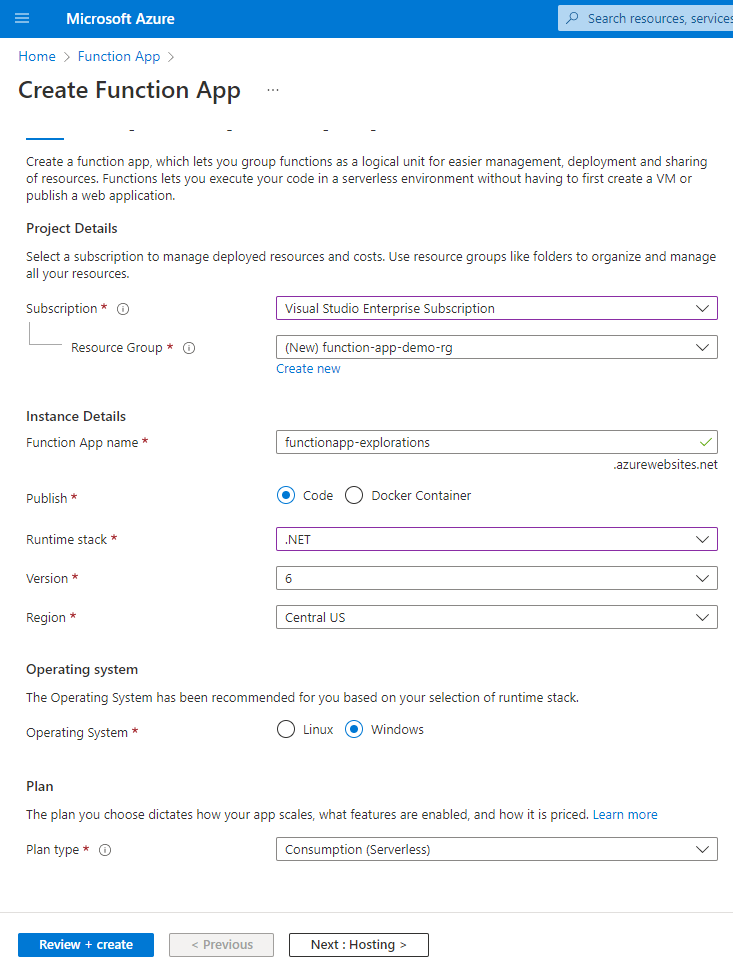
Click the Review + Create button and subsequently, the Create button, to create the function app. It may take a few minutes to create the function app. Once it’s ready, you can start creating and deploying your functions.
Your First Azure Function App
There are several ways to create and deploy your Azure Functions.
In-Portal Development
You can edit and test your functions directly in the Azure portal, using the built-in code editor and debugger. This is a quick and easy way to get started, but it’s not suitable for larger projects or for collaborating with other developers. But it certainly provides a hassle-free way to test the waters out.
- In the Azure portal, navigate to your function app and click the + button next to the Functions blade.
- Select the In-portal option to create the function in the portal.
- Choose a trigger for your function, such as an HTTP request, a timer, or a change in a storage queue.
- Choose a template for your function, such as an HTTP-triggered function or a queue-triggered function.
- Provide a name for your function and click the Create button.
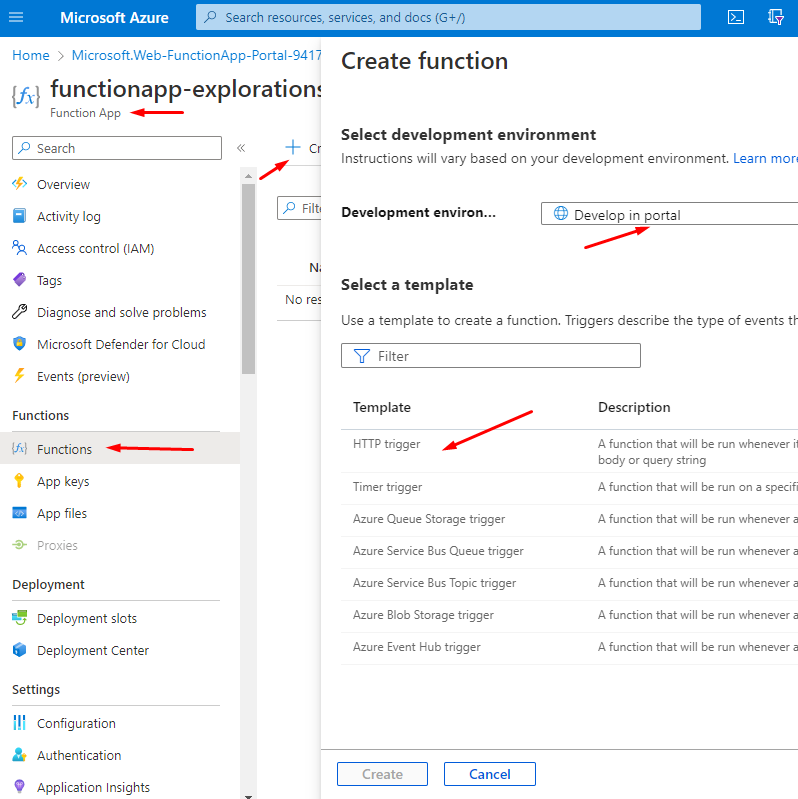
This will create a template function that will provide you with the basic structure of your function. I selected an HTTP trigger and as such, I get a “Get Function Url” button that gives me a unique URL to invoke my function.

I also chose to protect my function using a key. You can access those from the Function Keys menu. Press the “Code + Test” button. It will display the function code in a web-based editor with an integrated console for logs.
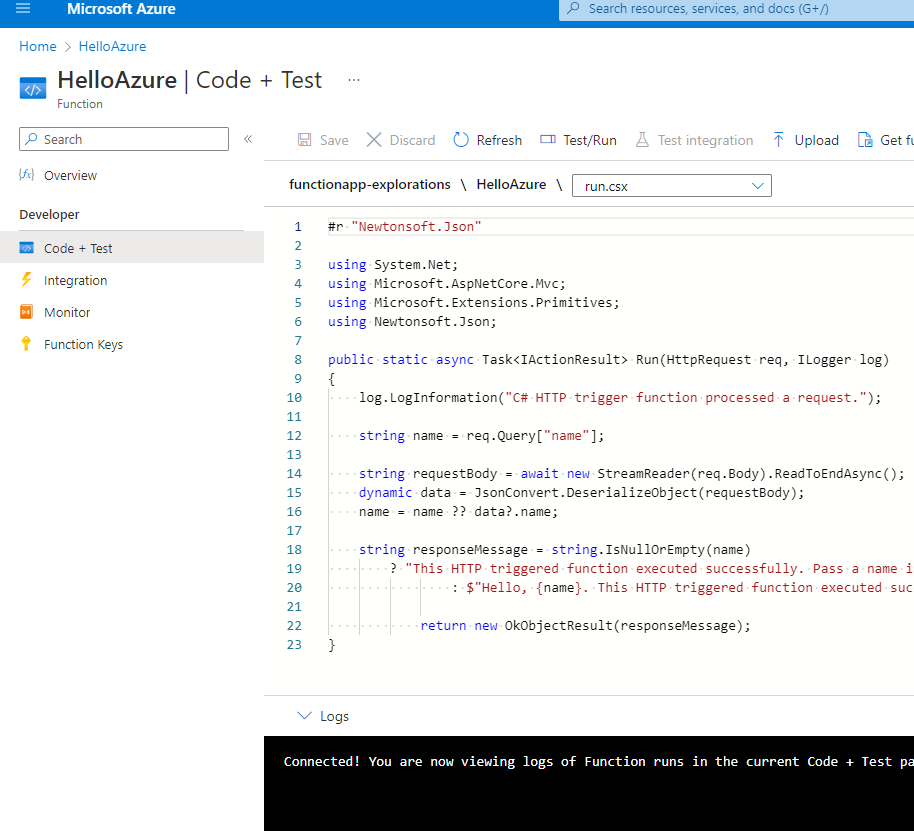
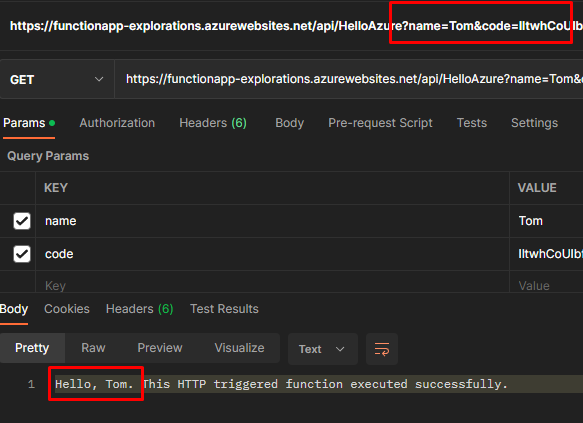
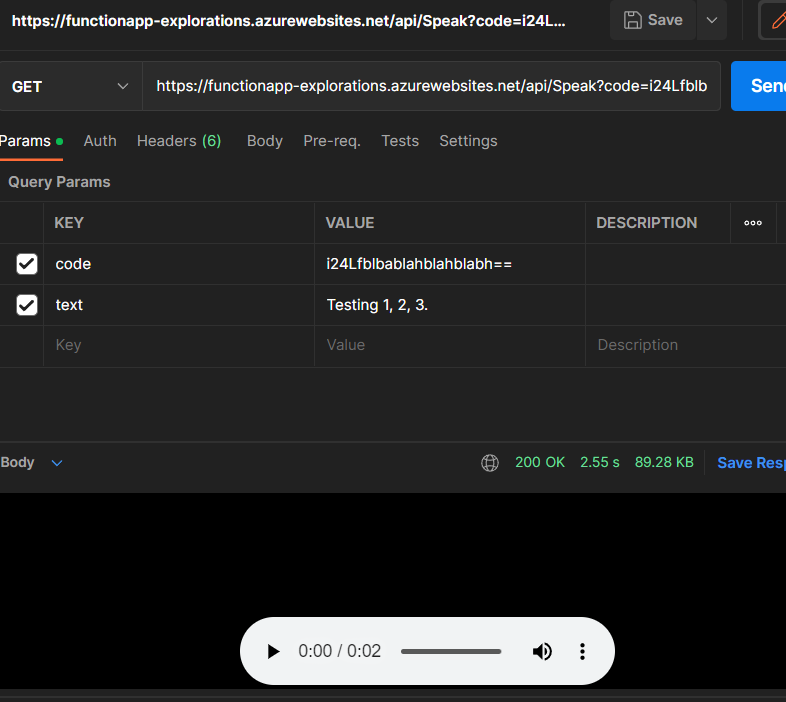
Before making any changes, try the template code out by itself. You can use the in-built “Test/Run” button or for a bit more fun, try to access the function externally, say from an API tool such as Postman.
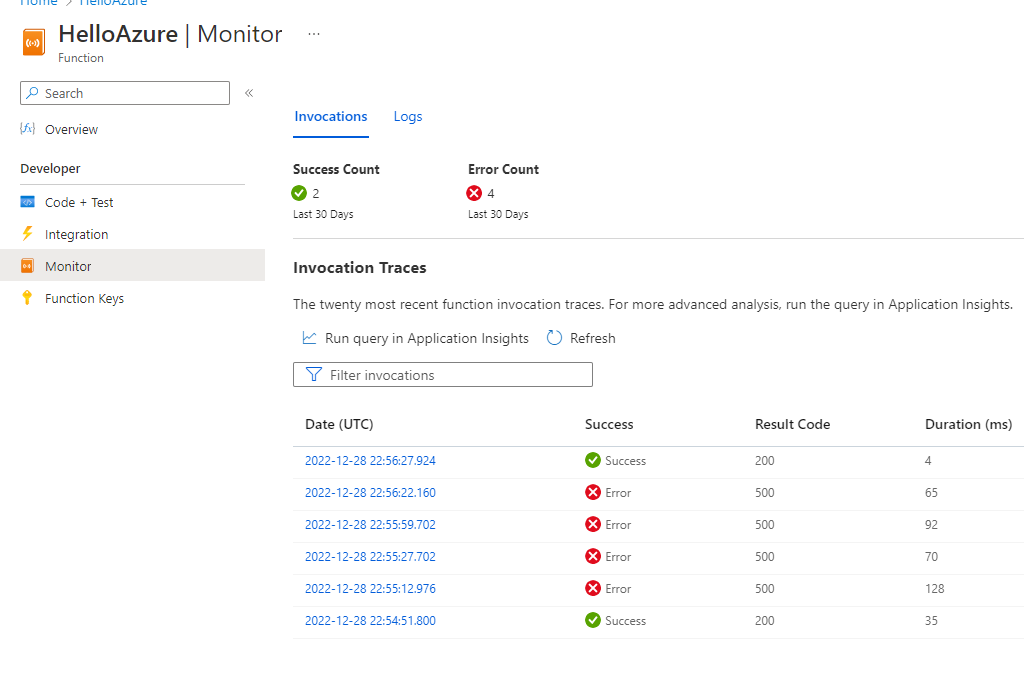
Want some logging and monitoring? Yes, it’s all wired up automagically for you in true Azure style. You get all the Azure Monitor and Log Analytics goodness, straight out of the box.
VS Code
You can use the Azure Functions extension for Visual Studio Code to develop and deploy your functions from a local development environment. This option provides a richer development experience, including support for code completion, debugging, and version control.

Visual Studio
You can use Visual Studio to develop and deploy your functions using the Azure Functions project template. This option is similar to Visual Studio Code, but provides a more powerful development environment with advanced features such as code refactoring and testing.
Deploying Your Function After Local Development
To deploy your functions using Visual Studio Code or Visual Studio, you’ll need to create a local Git repository and push your code to the function app’s Git endpoint. To do this, follow these steps:
- In the Azure portal, navigate to your function app and click the Get publish profile button. This will download a publish profile file that contains the credentials and endpoint for deploying your code.
- In Visual Studio Code or Visual Studio, create a new Azure Functions project and add your functions to it.
- In the terminal or command prompt, navigate to the root directory of your project and run the following command to initialize a local Git repository:
git init - Run the following command to add the Azure Functions Git endpoint as a remote repository:
git remote add <azure-git-endpoint> - Run the following command to push your code to the Azure Functions Git endpoint:
git push azure master
This will deploy your functions to the function app in Azure.
Something More Than Hello World
How about we try something a bit more interesting than the out-of-the box template? I cooked up the function below that converts text to synthesized speech, saves it as an audio file and responds back with the binary file. Now, if you want to try this out, you’ll need to create a Cognitive Services resource in Azure and generate your own keys.
Create a new Azure Functions project in VS Code or Visual Studio. Install the Microsoft.CognitiveServices.Speech package from NuGet. The completed function is included below:
using Microsoft.AspNetCore.Http;
using Microsoft.AspNetCore.Mvc;
using Microsoft.Azure.WebJobs;
using Microsoft.Azure.WebJobs.Extensions.Http;
using Microsoft.CognitiveServices.Speech;
using Microsoft.Extensions.Logging;
using Newtonsoft.Json;
using System.IO;
using System.Threading.Tasks;

namespace SpeakOutLoud
{
    public static class SpeechMaker
    {
        [FunctionName("Speak")]
        public static async Task<IActionResult> Run(
            [HttpTrigger(AuthorizationLevel.Function, "get", "post", Route = null)] HttpRequest req,
            ILogger log)
        {
            log.LogInformation("C# HTTP trigger function processed a request.");

            // Get the text to convert from the query string or request body
            string text = req.Query["text"];
            string requestBody = await new StreamReader(req.Body).ReadToEndAsync();
            dynamic data = JsonConvert.DeserializeObject(requestBody);
            text = text ?? data?.text;

            if (string.IsNullOrEmpty(text))
            {
                return new BadRequestObjectResult("Please provide a text to convert in the 'text' query string or request body");
            }

            // Convert the text to speech
            byte[] audioData;

            // Feel free to this bring in from external config.  This will do for a simple demo.
            var yourSubscriptionKey = "your-cognitive-services-key";
            var yourServiceRegion = "your-region-identifier";

            var speechConfig = SpeechConfig.FromSubscription(yourSubscriptionKey, yourServiceRegion);
            using (var synthesizer = new SpeechSynthesizer(speechConfig))
            {
                // Synthesize the text to speech
                using (var result = await synthesizer.SpeakTextAsync(text))
                {
                    if (result.Reason == ResultReason.SynthesizingAudioCompleted)
                    {
                        audioData = result.AudioData;
                    }
                    else
                    {
                        return new BadRequestObjectResult($"Failed to convert text to speech: {result.Reason}");
                    }
                }
            }

            // Return the audio data as a binary stream
            return new FileContentResult(audioData, "audio/x-wav");
        }
    }
}
Try it from Postman or a similar tool. If all goes well, you should have an audio file as a response.
Closing Remarks
You can get the complete sample project that I demo’d in this article from my GitHub, here:
https://github.com/tvaidyan/azure-functions-explorations
Azure Functions provide a very economical computing solution with the added benefit of not having to worry about infrastructure. At the time of this writing, you can have about a million executions of your function per month without having to pay anything. And even if you go over, the prices are relatively very cheap. With such low barrier to entry, definitely give these a try and see if they provide an elegant solution to your workloads.