
Last week, we got an introduction to GitHub Actions. There, we looked at how to create a workflow that will trigger automatically whenever code is pushed (or a PR is made) to the main branch. This workflow checked out the branch, built the code, ran unit tests and then created a deployment artifact. If you haven’t read that post, you can do so here. In this installment, we’ll look at how we can deploy our web app to Azure App Service.
Setting up an Azure App Service
If you are unfamiliar with this service, it is a Platform as a Service (PaaS) offering that Azure provides where you can host a web application without having to worry too much about Web Server setups or SSL configurations, scaling up and scaling out, or the many other concerns that arise if you were to do hosting from scratch. This platform supports a myriad of popular web application frameworks – modern cross-platform .NET (core), Windows only ASP.NET (4.x), Go, Java, Node, PHP, Python, and Ruby. App Service instances go under an App Service Plan so if you don’t have that provisioned, you can also create one of those, as part of the App Service setup process.
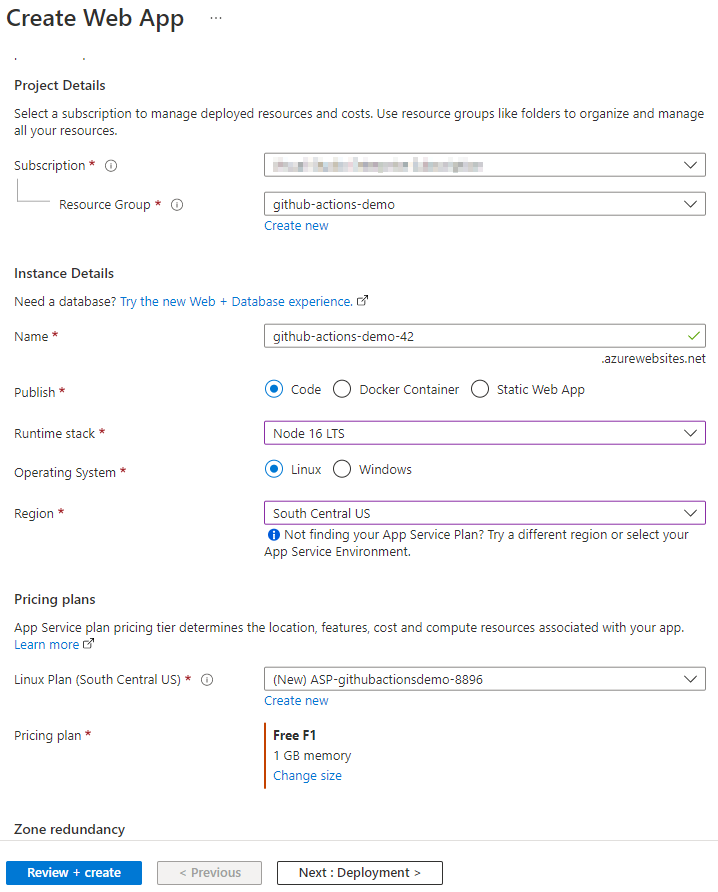
Once your instance is provisioned, which usually takes only a minute or two, navigate to your new resource.
Configure Node.js Server in App Service
If you are following along and created a Linux based instance, with a Node runtime stack, you need to do an additional step to have the instance start up your app and start serving requests. The node.js runtime stack container comes preinstalled with a process manager called PM2. We’ll use PM2 to start up our app upon initialization of the app service. To do so, head over to the Configuration section of your app service instance, the General Settings tab and specify a startup command:
pm2 serve /home/site/wwwroot --no-daemon
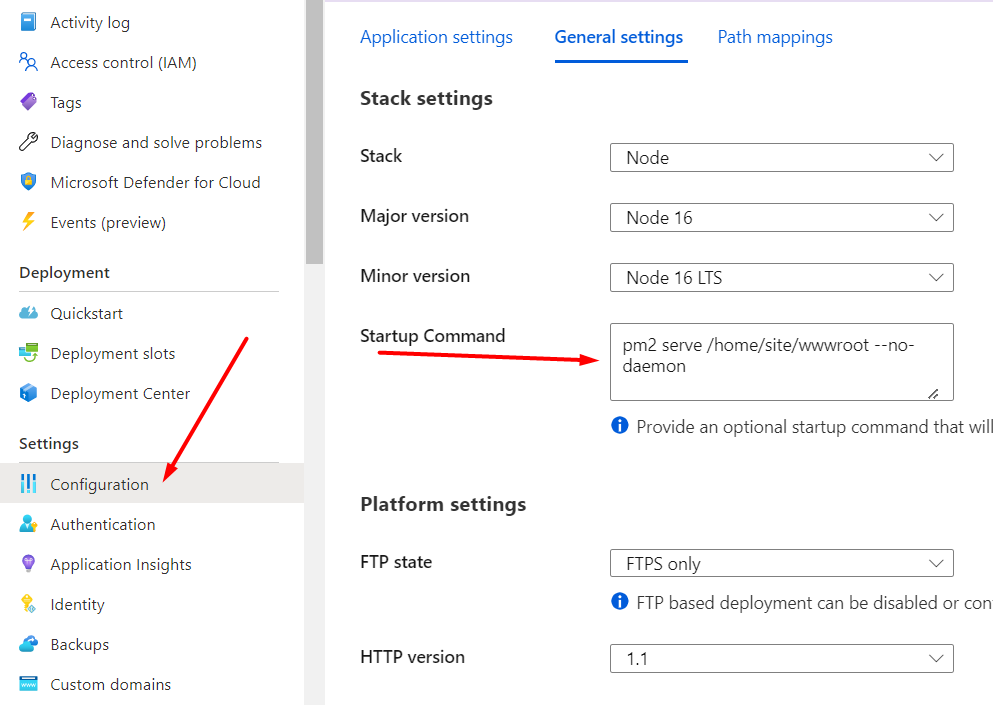
You can read more about this configuration process in the documentation, here. With this change, now your app service instance is ready to serve up requests, once your files are published.
Getting the Deployment Credentials from Azure App Service
From the overview tab, click on the “Download publish profile” button to download the publish profile for your specific instance, on to your local computer. It contains the necessary connection information that we need to give to GitHub, to have our GitHub Actions workflow take our web app and deploy it to our Azure App Service instance.
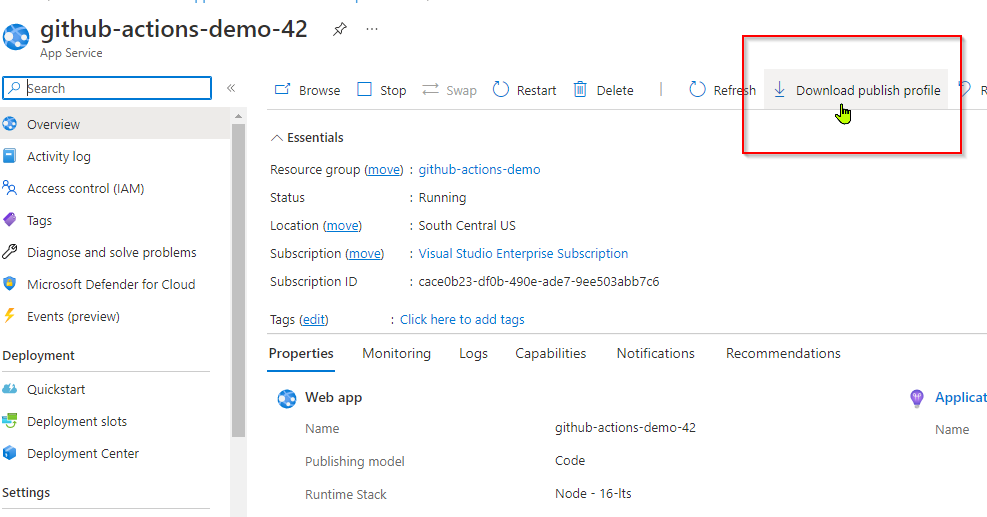
If you open this file up in a text editor, you’ll see that it is a relatively simple XML file. It specifies a handful of deployment options – Web Deploy, FTP, and Zip Deploy with relevant parameters for each. Note that this file contains secret information such as a password to programmatically connect to your Azure App Service instance and deploy code. Do not check this into Source Control. Keep this information secure.
Setting Up Deployment Secrets in GitHub
Next, head over to GitHub, to the repository where you have your GitHub Actions workflow setup. if you haven’t done so yet, you can check out last week’s episode to learn about that process. Clicking on the Settings menu item and navigate over to the Secrets section.
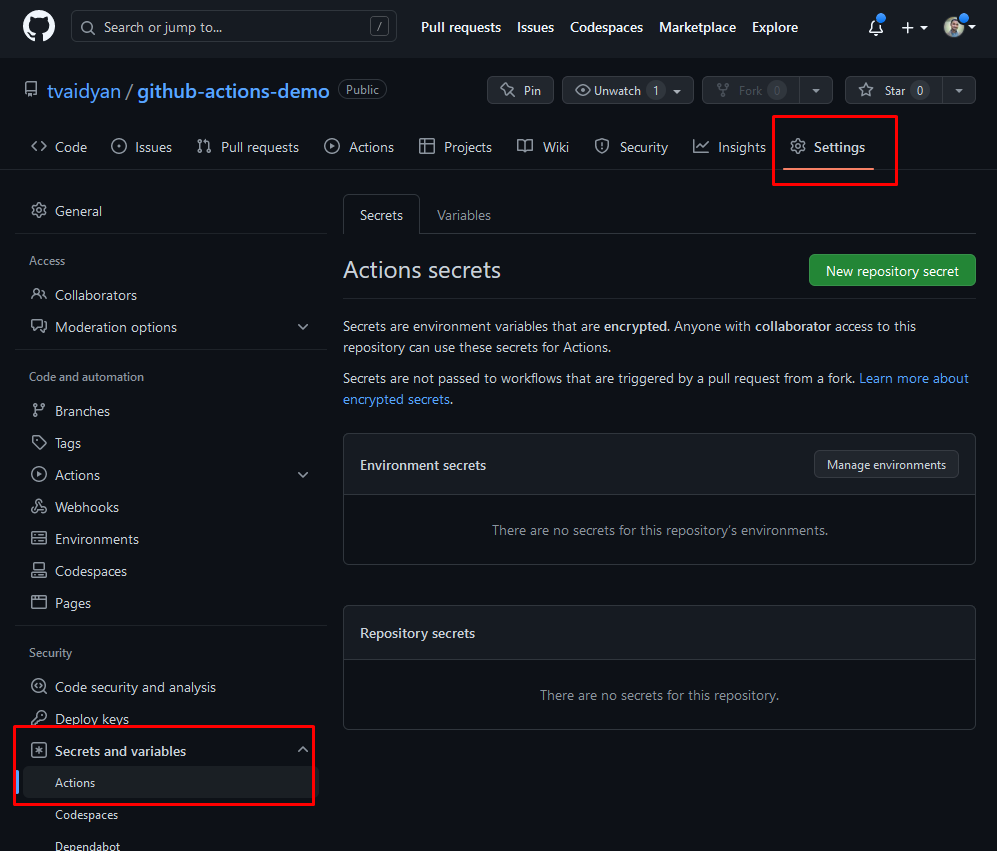
Add a new “repository secret”. Copy the contents of the publishprofile that you downloaded from Azure as the value of the secret. You can provide any name of your choosing. I chose the name AZURE_WEBAPP_PUBLISH_PROFILE.
Update GitHub Actions Workflow
Add a new step to the end of the GitHub Actions workflow we created last week, to deploy our code to our Azure App Service instance. I’m going to use the azure/webapps-deploy@v2 action provided by Microsoft Azure for this. This action takes the app-name, publish-profile and package as inputs. You can reference the secret that you created earlier in this file with the following syntax: ${{ secrets.AZURE_WEBAPP_PUBLISH_PROFILE }}.
Your (complete) updated workflow file should look similar to this:
# This is a basic workflow to help you get started with Actions

name: CI

# Controls when the workflow will run
on:
  # Triggers the workflow on push or pull request events but only for the "main" branch
  push:
    branches: [ "main" ]
  pull_request:
    branches: [ "main" ]

  # Allows you to run this workflow manually from the Actions tab
  workflow_dispatch:

# Setup environment variables
env:
  NODE_VERSION: '16.13'
  AZURE_WEBAPP_NAME: 'github-actions-demo-42'
  AZURE_WEBAPP_PACKAGE_PATH: 'hello-world/dist'

# A workflow run is made up of one or more jobs that can run sequentially or in parallel
jobs:
  # This workflow contains a single job called "build"
  build:
    # The type of runner that the job will run on
    runs-on: ubuntu-latest

    # Steps represent a sequence of tasks that will be executed as part of the job
    steps:
      # Checks-out your repository under $GITHUB_WORKSPACE, so your job can access it
      - uses: actions/checkout@v3

      - name: Set up Node.js
        uses: actions/setup-node@v3
        with:
          node-version: ${{ env.NODE_VERSION }}
          cache: 'npm'
          cache-dependency-path: '**/package-lock.json'
      - name: npm install, build, and test
        working-directory: hello-world
        run: |
          npm install
          npm run build --if-present
          npm run test:unit --if-present

      - name: Upload artifact for deployment job
        uses: actions/upload-artifact@v3
        with:
          name: frontend-site
          path: hello-world/dist

      - name: Deploy to Azure App Service
        uses: azure/webapps-deploy@v2
        with:
          app-name: ${{ env.AZURE_WEBAPP_NAME }}
          publish-profile: ${{ secrets.AZURE_WEBAPP_PUBLISH_PROFILE }}
          package: ${{ env.AZURE_WEBAPP_PACKAGE_PATH }}
Deploy Your App
Saving your updated workflow file should automatically trigger another run. Check the logs to ensure that you got a successful build and deployment.
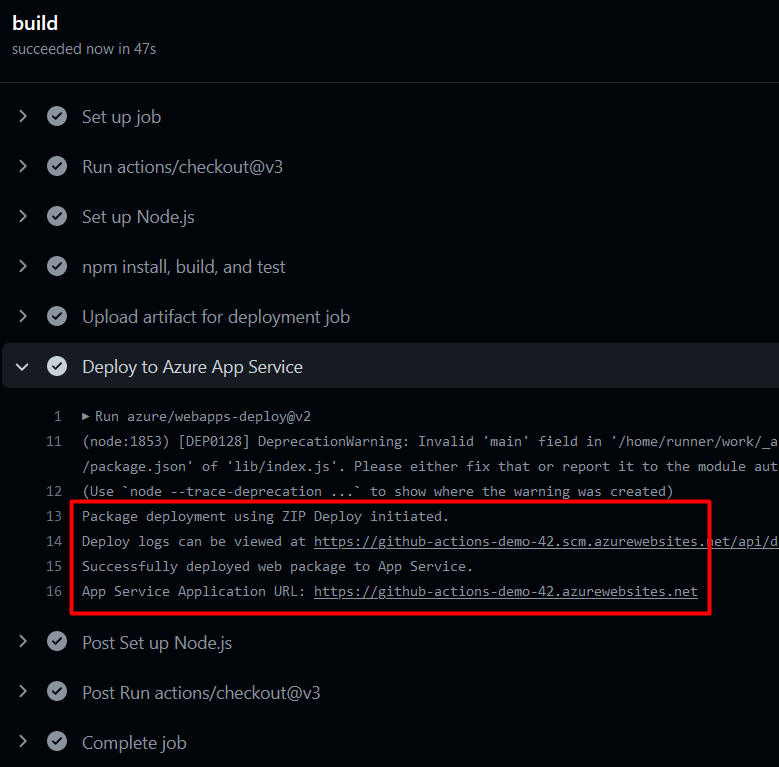
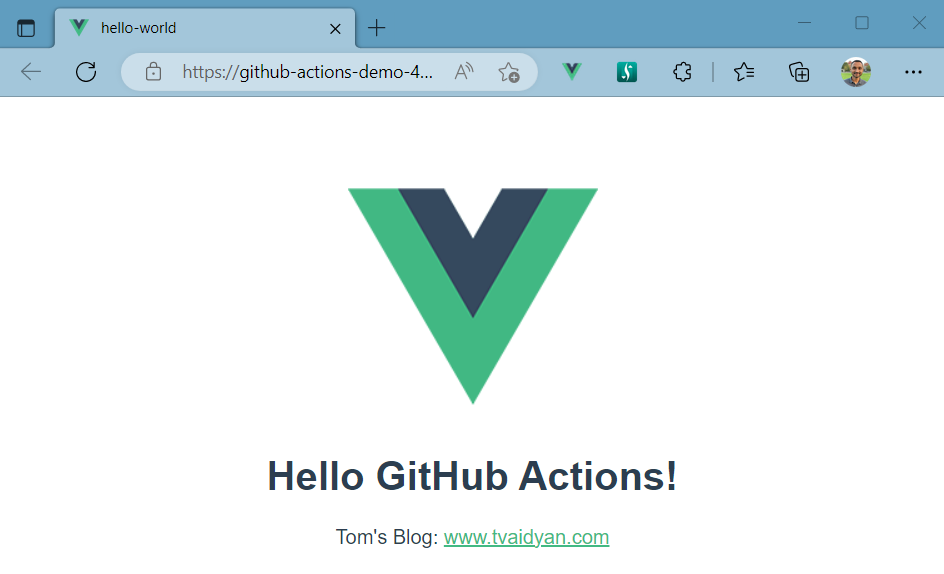
Head over to you app’s URL and confirm that your deployment is indeed successful and that your app is running.
Closing Thoughts
In this article, we walked through the process of deploying a Node.js application to Azure Web Apps using GitHub Actions. We started by setting up an Azure Web App and configuring it for Node.js, and then moved on to updating our GitHub Actions workflow that we started in the previous post, to deploy the application. By setting the publish profile as a secret and pushing code changes to GitHub, we were able to trigger the workflow and verify the deployment in Azure Web App.
Overall, using GitHub Actions in combination with Azure Web Apps allows for a streamlined and efficient deployment process for Node.js applications. It also allows for easy integration with other tools and services, allowing for more flexibility and automation in your development workflow.
As a reminder, it’s important to keep the deployment pipeline maintainable and to always have testing and monitoring in place. There are many resources available online to help you learn more about deploying Node.js applications to Azure Web Apps and using GitHub Actions, so be sure to check them out. Additionally, using best practices such as using environment variables and secrets can help you to make your deployment process more robust.
You can checkout the companion repository for this post on my GitHub, here: