
Last week, we got an introduction to OpenAPI in ASP.NET. In that article, we learned how to use the Swashbuckle library to generate documentation for our API endpoints, even interact with it using Swagger UI. If you haven’t seen it yet, you can check that out, here. This week, let’s build on that foundation and look at some of the finer points of Swashbuckle and OpenAPI to see how we can make this experience a bit more richer.
Add Metadata via XML Comments
Last week, we saw the out of the box experience you get with Swashbuckle and Swagger UI. But what if you wanted to add some more helpful information about your API endpoints to your consumers? One way you can achieve that is using XML comments in your code. With this approach you can add summaries, additional descriptions about the parameters that must be passed in, notes about the response codes generated by an endpoint, etc., so that your users have a solid understanding of how to exercise your API.
Firstly, you must enable XML comments in your project by modifying your .csproj file. You must include an additional property group setting named GenerateDocumentationFile. Your csproj file should look something like this:
<Project Sdk="Microsoft.NET.Sdk.Web">

  <PropertyGroup>
    <TargetFramework>net6.0</TargetFramework>
    <GenerateDocumentationFile>true</GenerateDocumentationFile>
  </PropertyGroup>

  <!-- Rest of your project file -->

</Project>
Once you’ve enabled XML documentation in your project file, you’ll need to configure Swashbuckle to use these XML comments. In your Startup.cs or Program.cs file, where you have configured Swashbuckle, you’ll need to add a line of code to tell it where to find the XML comments file.
Here’s how you can do that:
services.AddSwaggerGen(c =>
{
    c.SwaggerDoc("v1", new OpenApiInfo { Title = "My API", Version = "v1" });

    var xmlFile = $"{Assembly.GetExecutingAssembly().GetName().Name}.xml";
    var xmlPath = Path.Combine(AppContext.BaseDirectory, xmlFile);
    c.IncludeXmlComments(xmlPath);
});
Now, with that setup in place, let’s decorate one of our API endpoints with some XML comments.
/// <summary>
/// Fetches the weather forecast for the next 5 days.
/// </summary>
/// <param name="city" >The name of the city for which you need a forecast for.</param>
/// <response code="200">Returns the forecast if the City is valid.</response>
/// <response code="404">If the city doesn't exist</response>
[HttpGet(Name = "GetWeatherForecast")]
public IEnumerable<WeatherForecast> Get(string city)
{
    ...
}
Build and run your application and navigate to the Swagger UI page. You’ll see the additional metadata that you added appearing in the UI.

Use Attribute Annotations
If you don’t like using XML comments, another approach that you can take is to decorate your action methods with attributes. While XML comments allow for detailed descriptions, attributes can be a more streamlined and type-safe approach to defining certain aspects of your API documentation. Consider this minimal API implementation:
using Microsoft.AspNetCore.Mvc;
var builder = WebApplication.CreateBuilder(args);
builder.Services.AddEndpointsApiExplorer();
builder.Services.AddSwaggerGen();
var app = builder.Build();
if (app.Environment.IsDevelopment())
{
app.UseSwagger();
app.UseSwaggerUI();
}
app.MapGet("/weatherforecast",
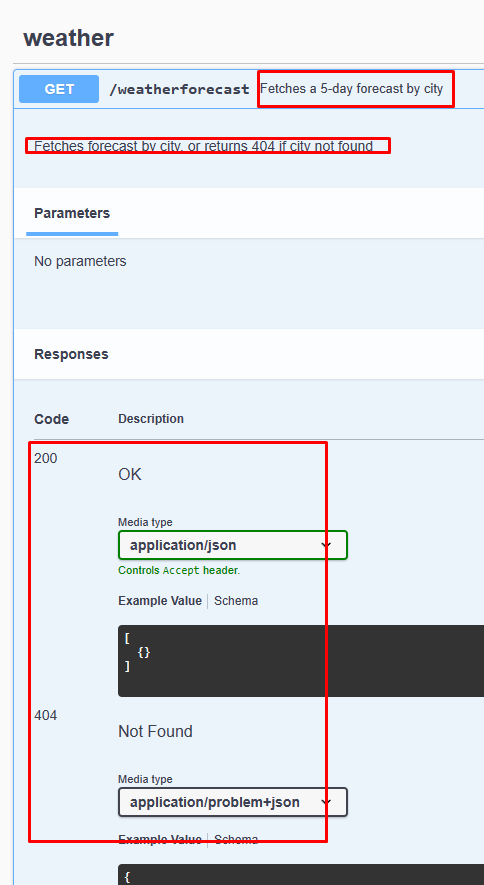
[EndpointSummary("Fetches a 5-day forecast by city")]
[EndpointDescription("Fetches forecast by city, or returns 404 if city not found")]
[ProducesResponseType(typeof(IEnumerable<WeatherForecast>), 200)]
[ProducesResponseType(typeof(HttpValidationProblemDetails), 404, "application/problem+json")]
[Tags("weather")]
() => "<your code goes here>").WithOpenApi();
app.Run();
We are already used to [HttpGet], [HttpPost], [Authorize] and other such attribute decorators when coding our APIs in ASP.NET. Similarly, you can additional attributes that ASP.NET provides to add more meaning to your APIs. In the example above, I’m using the EndpointSummary, EndpointDescription, ProducesResponseType and Tags attributes to add the same type of information that I was specifying in my XML comments in the previous example. Note that I’m using the WithOpenApi() extension method on my MapGet call to have Swashbuckle grab that metadata when generation the interactive documentation UI.
Run you application and navigate to the Swagger UI page and it displays the metadata that you added.
You can also use the same approach when creating the classic Controllers based API endpoints. Some of the attributes such as ProducesResponseType is supported out of that box while some others are not yet supported. However, in such cases, you can do a little bit of additional work to extend Swashbuckle functionality to honor those additional metadata attributes.
Use Fluent Methods
Yet another approach that you can take is to use a fluent API to add additional meta data to your APIs.
app.MapGet("/weatherforecast",
() => "<your code goes here>")
    .WithName("GetWeather")
.WithTags("weather")
.Produces<IEnumerable<WeatherForecast>>()
.ProducesProblem(404)
.WithSummary("Fetch a five-day forecast for a given city")
.WithDescription("Fetches a forecast by city, or returns 404 if city not found")
.WithOpenApi();
In this example, we’re defining the same metadata as in the previous examples but here, we’re expressing them as fluent methods. If you are used to libraries such as FluentValidation and FluentAssertion, you’ll recognize this style. This style produces what many consider “readable” code as it reads like natural spoken English, in many cases.
Closing Thoughts
Today, we looked at three different ways to add additional color to your API documentation:
- XML Comments
- Attributes
- Fluent Methods
Next week, let’s start exploring NSwag, another .NET implementation of OpenAPI.