
In Part 1, we went over the basics and got introduced to Swashbuckle. In Part 2, we looked at some additional metadata that we can add to our APIs so that they can be utilized by OpenAPI and Swashbuckle in particular. Today let’s look at another OpenAPI implementation in the dotnet ecosystem – NSwag.
What is NSwag?
NSwag is another OpenAPI implementation in the .NET world. Just like Swashbuckle, NSwag also is able to automatically generate documentation for your ASP.NET Web APIs. It also provides interactive documentation capabilities that allow consumers of your API to exercise your APIs without building any client tools.
NSwag however as a few other tricks up its sleeve. It can do client-side code generation. Swag generates client-side code in several languages such as TypeScript, JavaScript, C#, and more. This saves developers significant time and effort that would otherwise be spent writing boilerplate code. Moreover, you can integrate NSwag into your build process so that it automatically generates this client-side code automatically, every time you update your APIs.
Install and Use
To add NSwag to your ASP.NET project, install the NSwag.AspNetCore package.
dotnet add package NSwag.AspNetCoreNext, add and configure the Swagger middleware. In your Startup.cs or Program.cs file, or wherever you are registering the required services for your app, registered the required Swagger services, as well:
builder.Services.AddSwaggerDocument();Next, just like we did with Swashbuckle, enable the middleware for serving the OpenAPI specification file and also the interactive Swagger UI:
if (app.Environment.IsDevelopment())
{
    app.UseOpenApi();
    app.UseSwaggerUi3();
}
Run your application and navigate to http://localhost:/swagger to view the Swagger UI. Navigate to http://localhost:/swagger/v1/swagger.json to view the OpenAPI specification file.
Generate Clients
NSwag allows you to generate client code to connect to your APIs. You can do this in a handful of ways:
- Use the NSwag.CodeGeneration.CSharp or NSwag.CodeGeneration.TypeScript NuGet packages.
- If you want to integrate NSwag with your build process, you an use the NSwag.MSBuild NuGet package.
- If you’re on a Windows machine, you can install and use NSwagStudio. This is the approach that I’ll demonstrate in this post, today.
NSwagStudio
Download and install the latest version of NSwagStudio from the project’s GitHub page. The UI may not be the flashiest app that you’ve come across but it does offer quite a range of options.
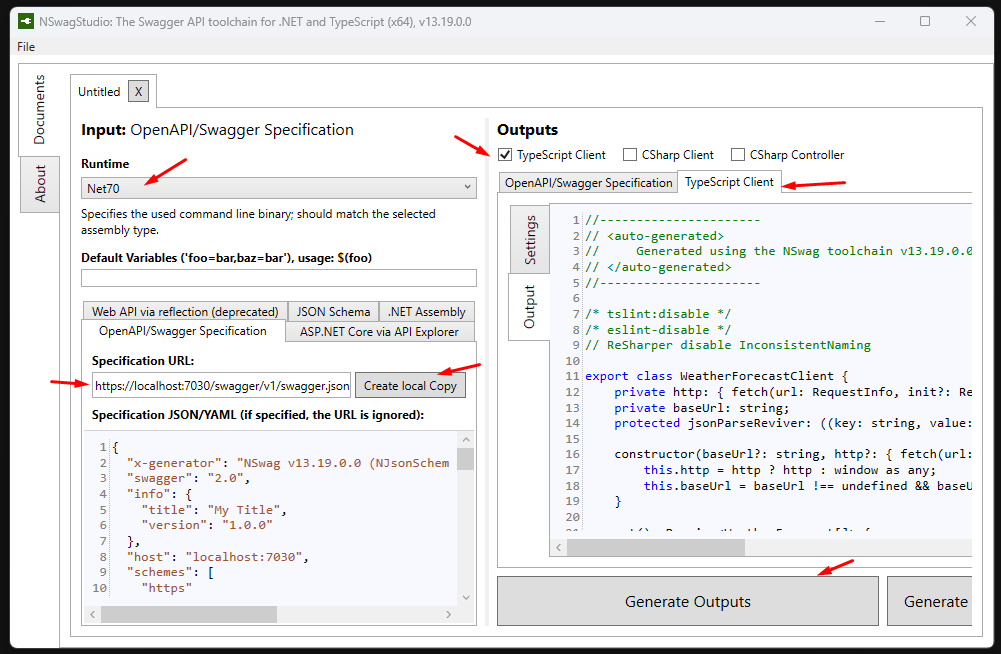
First, select the Runtime version of your API. Next, assuming that your API is running, specify the URL of OpenAPI specification file in the “Specification URL” and click on the “Create local Copy” button. On the right side, select the type of client you are interested in and click on the “Generate Outputs” button. In my screenshot above, you’ll see that I’ve generated a TypeScript client. I can copy the TypeScript code that it generated into my UI project code, whether that’s Angular, React, Vue or any other TypeScript/JavaScript based project, and then fine-tune it to hook up my frontend app to my backend APIs, without having to write all that boilerplate code from scratch.
Also, take a look at the “Settings” tab. It gives you a good deal of customization options to dictate how the client-side code should be generated.

Conclusion
NSwag provides an impressive set of capabilities in terms of generating client-side code and documenting APIs, saving you some precious development time and effort. Give it a try on your next web project and see what benefits you can unlock in your workflow with the use of these tools and the OpenAPI specification. Also, if you haven’t already done so, please check out the first two parts of this series on OpenAPI right here on my blog.