
Last week we got an introduction to Azure monitoring and alerting. In that post, we set up our first alert — an HTTP server error (5xx) check and alert against an Azure App Service instance. Another type of monitoring and alerting that you can set up with Azure is known as Application Insights Availability Tests. Is your web app available to serve up requests to your customers? Moreover, is it available in the region where your customers are accessing your application from? In today’s post, let’s set up one of these web tests and then subsequently set up an alert against it.
What are Application Insights Availability Tests?
This is a feature that the Azure platform provides under the Application Insights umbrella. It allows you to setup pings — web requests to your web app from different regions within the global Azure infrastructure. Based on your setup, it will make the requests on your set interval and record whether the test produced a success or error response. You can then create an Azure Alert based on this metric to notify if your web application availability falls below your desired thresholds.
There are a few types of availability tests that you can wire-up. The now older versions of these tests, now referred to as Classic Tests, rely on public DNS infrastructure to locate and traverse your web endpoints. Under this umbrella, there are two types of tests — URL ping tests and Multi-step web tests. The former allows you to simply hit an endpoint and track the responses while the latter allows you to specify a sequences of events and track the response accordingly. However, note that the multi-step web tests are now marked as deprecated. The newer variant of these tests are referred to as Standard tests. These types of tests are similar to the URL ping tests and they’re good for checking TLS/SSL certificate validity, and to also track responses for HTTP GET, HEAD and POST requests.
Set Up an Application Insights Availability Test
To set up an availability tests, first navigate to your Application Insights instance that’s connected to your App Service or other web resource. If you’re unfamiliar with this, please refer to my previous post. Once there, you can locate the Standard Test option under the availability pane.
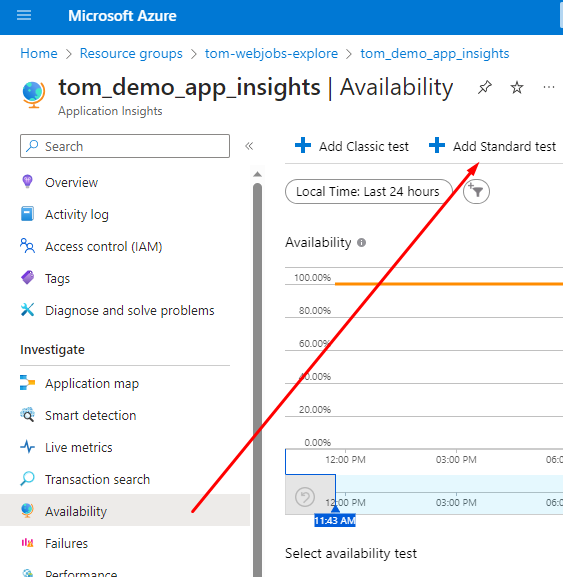
Click on the “Add Standard Test” button and it will open a form where you can specify the details of your test.
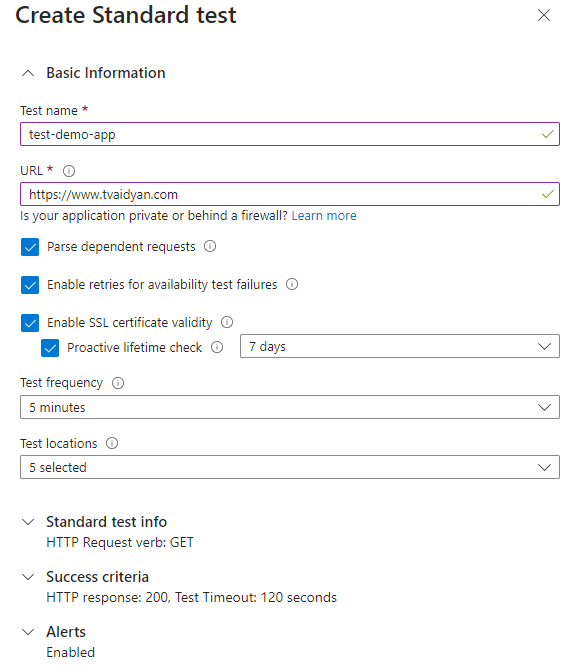
Name: Provide a meaningful name for your test.
URL: Enter the URL that you want the test to hit. It must be an endpoint that can be reached from the public internet. It is also smart to follow any redirects.
Parse Dependent Requests: Most web application is comprised of not only HTML output but also related JavaScript, CSS and graphics. To get a more realistic representation of your actual traffic, you can specify that your test make requests of these related resources, as well.
Enable Retries: With the public internet, you can expect momentary blips to occur in normal web traversal. As such, it is prudent to turn on retries to avoid getting too many alerts when they’re not really warranted.
Enable SSL Validity: With the advent of Let’s Encrypt and similar projects that make the setting up and renewal of TLS certificates automatic and painless, this may be less of a concern. But you can check this box to have your test check the expiry date of your SSL certificate and notify if it is dangerously close to being expired.
Test Locations: You can specify on or more Azure regions in this section and the tests will invoke your web requests from those regions. This will give you a realistic picture of the response of your application from where your customers are accessing it.
Standard Test Info / Success Criteria: While the defaults will allow you to do an HTTP GET and expect a 200 OK, you can tweak this to do other types of HTTP requests and also program it to look for responses other than a 200 OK.
Alerts: By default, it will setup an Azure Alert for you, when creating this availability test. If your defaults are set appropriately, this option may work for you. Or you can set up an alert manually, which we’ll cover in the next section.
Set Up an Alert (Manually)
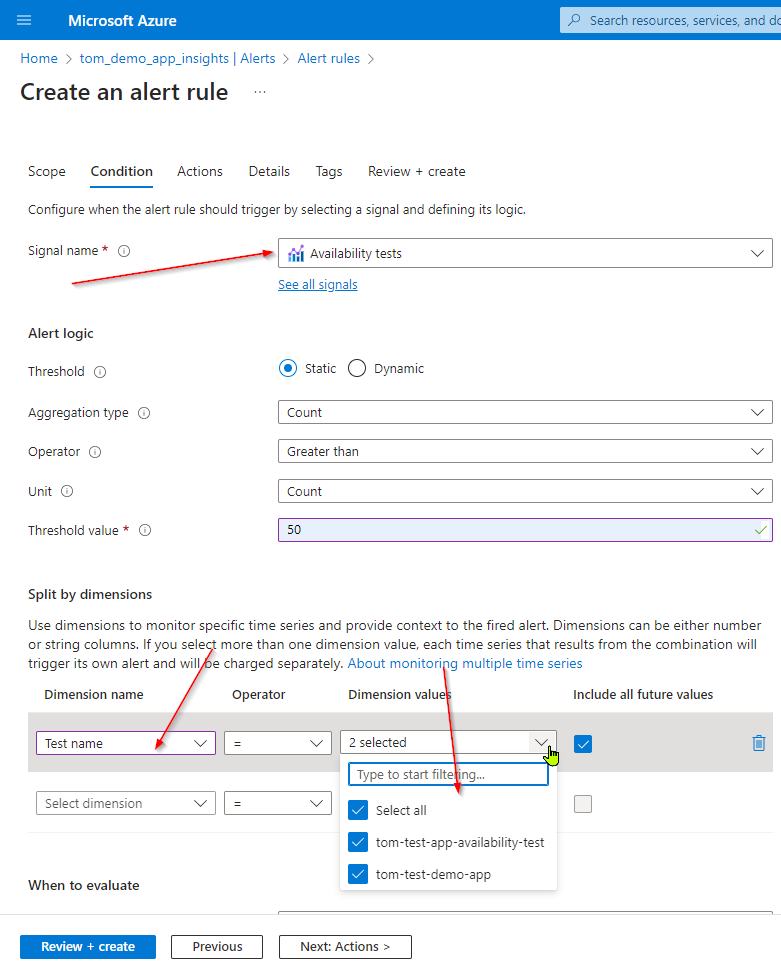
To set up an alert for an existing web availability test, navigate to the Alerts pane of your Application Insights resource. Click on the Create button and subsequently the Alert Rule option. Just like we did last week, specify the parameters of your alert. For the signal type, find and select “Availability Tests”. Under dimensions, select “Test name” and point it to the test that you previously set up.
Closing Remarks
Today we looked at how we can keep track of our web application availability through Application Insights Availability Tests. You can learn more about this feature from the documentation, here.