
In the last episode, we talked about how we can run our Docker containers in Azure through App Service. Today, we’ll look at Azure Container Instances. ACI is another service provided by Azure that provides a simplified platform for running Docker containers without needing to manage complex orchestration systems. In this introductory post, we’ll look at how we can get started by running our first docker container in ACI.
Create an App
In the last episode, we created a demo ASP.NET app using Visual Studio. We also got a Dockerfile along with this by simply ticking a checkbox in the New Project modal in VS. Today, let’s change things up a bit and work with a simple Node app instead. Create a file named app.js and add the following code:
const express = require('express');
const app = express();
const port = 80;

app.get('/', (req, res) => {
    res.send('Hello ACI!');
});

app.listen(port, () => {
    console.log(`Example app listening at http://localhost:${port}`);
});
If you’re unfamiliar with Node/JavaScript, no worries. It’s only tangentially related to what we’re doing. This simple app above is using the Express web server package. We’re configuring it to respond to a web request with the string “Hello ACI!”. We’re also configuring it to listen on port 80 for any incoming web requests.
If you want to run this app locally, you should have Node and npm installed. Then you can navigate to the directory where you have your app.js file via your terminal and run these commands:
#download and install the Express web server package
npm install express

# run your app
node app.js
Fire up your browser and navigate to http://localhost/ and you should see your “Hello ACI!” app running. Congrats! You have a Node app! Next, let’s package that up as a Docker image.
Create Docker Image
In the same directory where your app.js resides, create a file named Dockerfile. Input the following contents:
FROM node:16

WORKDIR C:/Development/HelloACI

COPY package*.json ./

RUN npm install

COPY . .

EXPOSE 80

CMD ["node", "app.js"]
The above Dockerfile specifies that the creation should use the base Node image, download and install the dependencies specified in the package.json file, copy the contents to the base of the container, expose port 80 and then run the node command on app.js. This will stand up the webserver, as we did manually in the earlier steps.
Publish Docker Image
Now that we have our app and Dockerfile ready, we need to build it and push it to a container registry. We’re going to be using the same Azure Container Registry (ACR) that we used in the previous post. I’ll assume that you already went through that post and have an ACR ready, understand the quirks about tagging your image a certain way, logging into your ACR and pushing an image there.
az login
az account set --subscription "<Your-Subscription-Name>"

az acr login --name <RegistryName>

docker tag [your image name] [your ACR name].azurecr.io/[rest of the tag]

az acr build -- registry <RegistryName> --resource-group <Your-Resource-Group> --image [your ACR name].azurecr.io/[rest of the tag]
The above commands log you into your Azure Subscription, authenticates you with your ACR, tags your Docker image, builds it, and publishes it to your ACR. You can login to the Azure portal, navigate to your ACR and see the images that are hosted there.
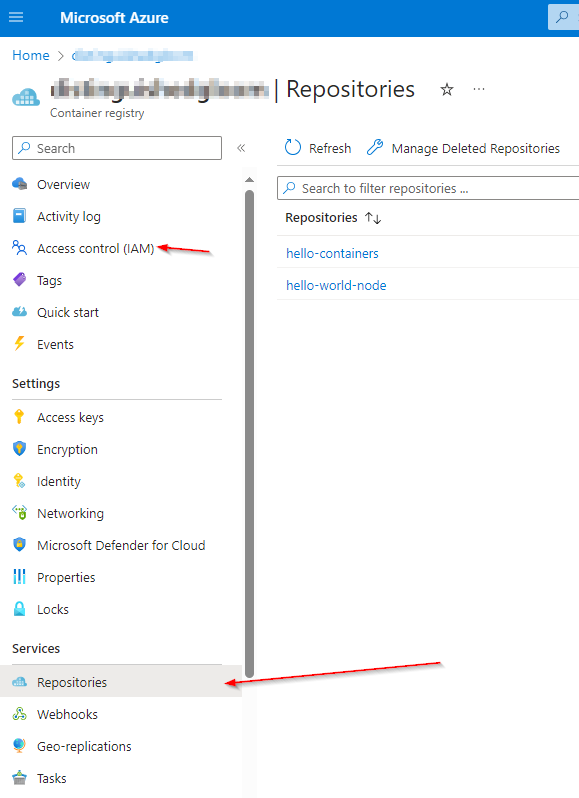
Note: If you get a permissions related error when visiting the “Repositories” blade, navigate to the “Access control” tab and add yourself as a user. Choose the “Reader” role, search and find your username and add it as a member of that role.
Deploy Docker Container to Azure Container Instances
We’re done with all the prep work. We have an app which has been dockerized and published to a container registry. Now, let’s create an Azure Container Instance. Search for “container instance” within the portal and create a new one.
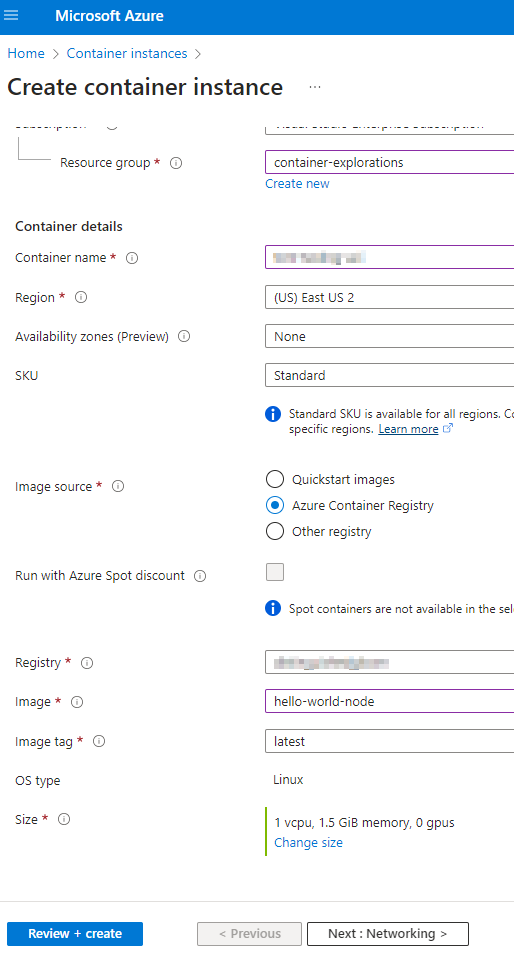
For “Image source”, specify that your image is hosted in “Azure Container Registry”. Select the registry that you’re using from the dropdown and subsequently, select the image that you want to run as a container. Go on to the next step, “Networking.” Here, enter a “DNS Name Label” which you’ll use later to navigate to your app. Step through the remaining steps of the wizard choosing the defaults, Review and Create your instance.
Once the deployment is complete, navigate to your resource. On the “Overview” blade, you’ll see your fully-qualified domain name (FQDN) displayed. Copy that and navigate to it via a browser to see your app running as a container, in the cloud!
Conclusion
Congratulations! You’ve successfully deployed a “Hello World” application using Azure Container Instances. This service gives you the benefits of running Docker containers without having to manage a full-fledged orchestration system. But if that’s what you really want to do, stay tuned. In upcoming installments, we’ll look at yet another way to run your docker containers in the Azure Cloud — using Kubernetes.