
You can certainly download and install the Azure Cosmos DB Emulator directly on your Windows machine. Without Docker. If that’s what you want to do, you can follow the documentation in this guide.
You can also run the emulator in a Windows Docker container. Just so you don’t miss the distinction that I’m making here, let me clarify – that’s not just a container running on a Windows machine, that’s a Windows container running on a Windows machine. If that’s what you’re after, you can follow the instructions here. However, this brings about another set of challenges that may make this option an undesirable one for you. For instance, you can’t run Linux containers and Windows containers on Docker, side-by-side. In my experience, there is an abundance of Linux Docker images and my use-cases often involve using one or more of those. So, I’m not willing to change my Docker Desktop config to switch to using Windows containers (exclusively).
So that brings us to the topic of this post – running Azure Cosmos DB emulator as a Linux container on a Windows machine. If you’re instead on a Mac, there is a pretty straightforward guide on how to do this (scroll down to the section titled “Run the Linux Emulator on macOS”). This blog post provides a similar guide on how to do the exact same thing on Windows. I’ve went ahead and converted the commands to get your IP address into a variable, then starting up the Docker container with that IP and all into PowerShell so that the Windows system can understand those. I’ve also written some PowerShell to pull down a certificate from the Cosmos container and then import it into the Certificate store on your Windows computer so that your browser or any applications that you are writing to connect to that Cosmos DB doesn’t complain about using a self-signed certificate.
Note: I’m using the cross-platform version of PowerShell, not “Windows PowerShell”. You can download and install the cross-plat version from the Microsoft Store. Some of the commands will only work with this version.
Get the Cosmos DB Emulator Image and Create a Container
If you don’t have Docker Desktop, go to docker.com to download Docker Desktop for Windows. Install it. If it’s not already turned on, you’ll also need to:
- Enable Windows Subsystem for Linux (WSL)
- Enable virtualization capabilities in your BIOS
The exact steps may vary slightly but there are already plenty of guides on these that you can look for and follow.
Use the PowerShell shell on your Windows computer and run the following commands. First, we want to retrieve the local IPv4 address of our computer and store it in a variable. We’ll need this in a later step to have Docker create a Cosmos DB container and bind it to this particular IP address.
$ipaddr = (Get-NetIPConfiguration | Where-Object {$_.IPv4DefaultGateway -ne $null -and $_.NetAdapter.Status -ne "Disconnected"}).IPv4Address.IPAddress.split()[0]
Next, pull down the Docker image for Azure Cosmos DB.
docker pull mcr.microsoft.com/cosmosdb/linux/azure-cosmos-emulator
Using that image, let’s create a new container with the following configuration settings:
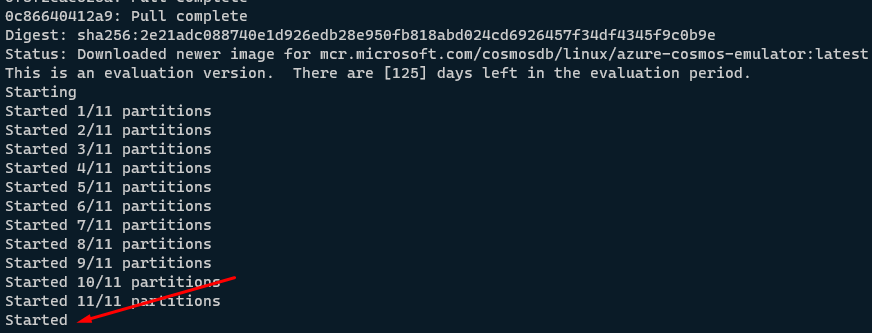
docker run -p 8081:8081 -p 10251:10251 -p 10252:10252 -p 10253:10253 -p 10254:10254 -m 3g --cpus=2.0 --name=test-linux-emulator -e AZURE_COSMOS_EMULATOR_PARTITION_COUNT=10 -e AZURE_COSMOS_EMULATOR_ENABLE_DATA_PERSISTENCE=true -e AZURE_COSMOS_EMULATOR_IP_ADDRESS_OVERRIDE=$ipaddr -it mcr.microsoft.com/cosmosdb/linux/azure-cosmos-emulator
If all goes well, you should have output, similar to what I have below, signaling that the database is running.
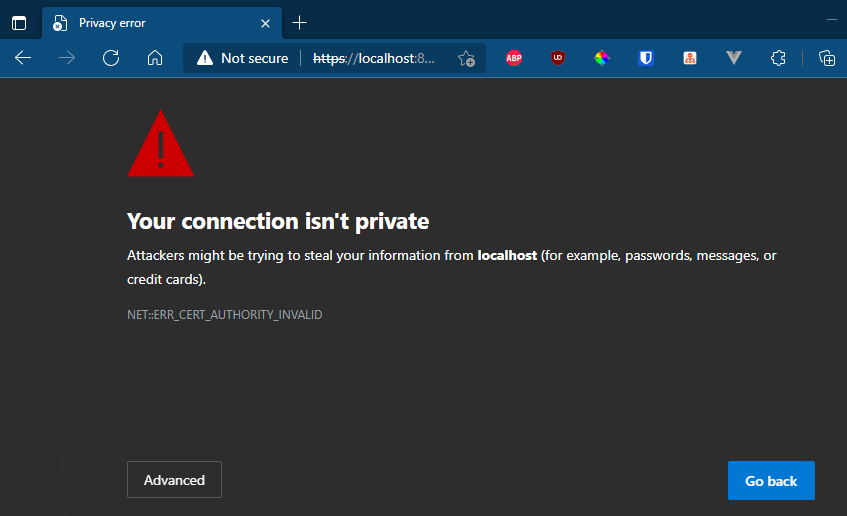
That’s awesome but we’re not done yet. If we bring up the web UI for the database in the browser, you’ll see that it generates a certificate warning urging not to go to this suspicious site. Not only that, if you write code against this instance, most libraries will not connect to it either unless you write some additional code to ignore certificate warnings and errors and all.
Download and Import Certificate to Local Trusted Root Certificate Store
Leaving the terminal window that’s running the Cosmos DB container (we don’t want to terminate that process), open a brand new terminal window. Use the same PowerShell snippet we used earlier to find out IP address and store it in a variable.
$ipaddr = (Get-NetIPConfiguration | Where-Object {$_.IPv4DefaultGateway -ne $null -and $_.NetAdapter.Status -ne "Disconnected"}).IPv4Address.IPAddress.split()[0]
Execute the following command to download and save that certificate to a directory you specify with a name of your choosing.
curl -k https://$($ipaddr):8081/_explorer/emulator.pem > "C:\certs\emulator.crt"
With the help of the .NET framework, let’s get an instance of this certificate object and extract the thumbprint from it.
$thumbprint = (New-Object System.Security.Cryptography.X509Certificates.X509Certificate2 "C:\certs\emulator.crt").Thumbprint
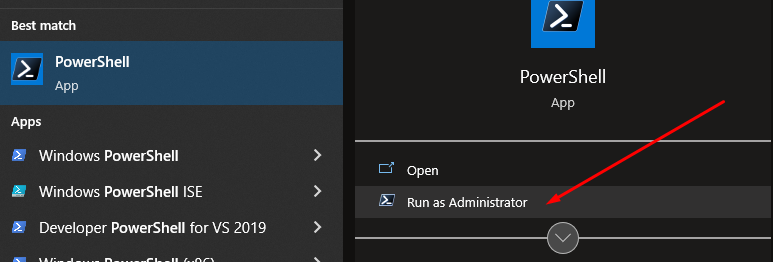
Now, in order to import a certificate, you need an elevated prompt. You can run the PowerShell prompt as an administrator by searching for “PowerShell” within your Start menu and selecting “Run as Administrator”.
Let’s import this certificate to the local machine’s trusted root certificate store. I’m also adding a friendly name for the certificate so that I can later identify this.
# Import cert
$certStore = "cert:\LocalMachine\Root"
Import-Certificate -FilePath $($certFileLocation) -CertStoreLocation $($certStore)

# Set friendly name
$certPath = $($certStore) + "\" + $($thumbprint)
(Get-ChildItem -Path $($certPath)).FriendlyName='CosmosDB Emulator Test'
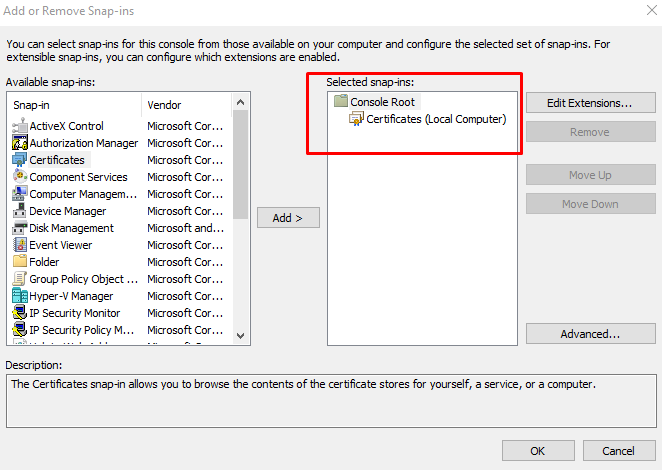
If you want to go and verify that the certificate imported successfully, you can do so by opening the Microsoft Management Console (MMC). To do so, press [Windows Key] + R to open the “Run Dialog.” Enter “mmc” and press enter. Once the MMC opens, from the top menu navigation, select, “Add/Remove Snap-ins” and select the “Certificates” snap-in. When prompted, choose “Computer account” and “Local computer”.
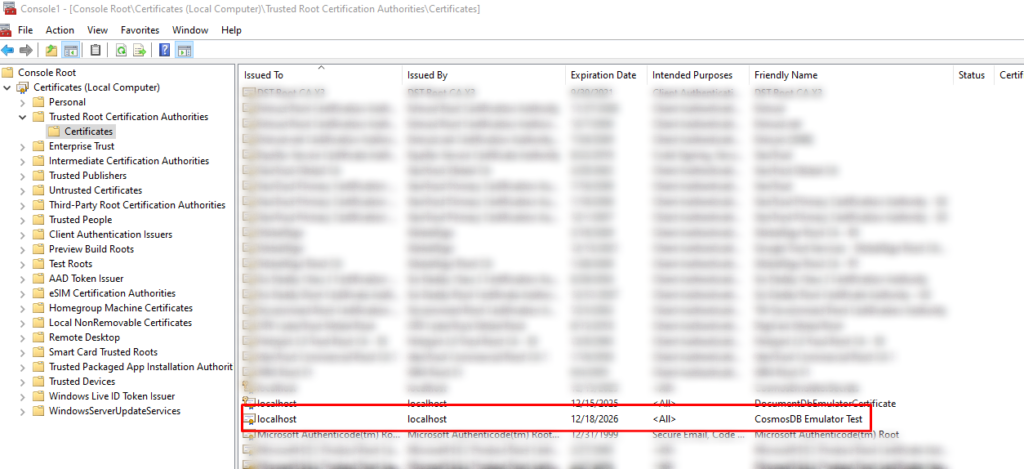
Navigate to the “Trusted Root Certification Authorities” store and you should see a certificate issued for “localhost” with the friendly name you provided.
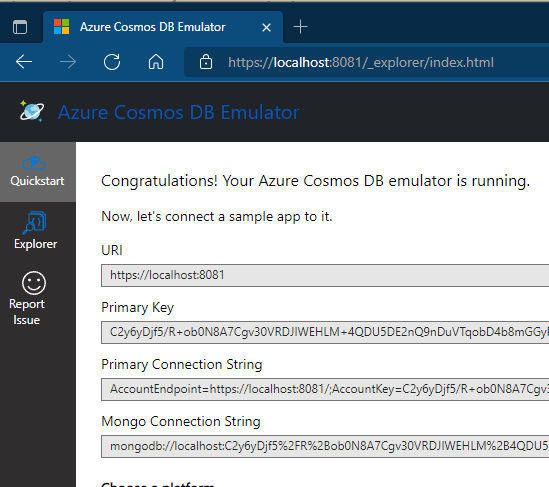
Now, open a new browser window and head back to the CosmosDB web interface as “https://localhost:8081/_explorer/index.html”. Your browser should be happier with no security warnings!
Parting Thoughts
To speed things up, you can execute the statements above in two passes – 1) download and run an Azure Cosmos DB container and 2) in a separate elevated PowerShell prompt, download certificate and import it to the local trusted store. For your convenience, here are those two blocks, below.
$ipaddr = (Get-NetIPConfiguration | Where-Object {$_.IPv4DefaultGateway -ne $null -and $_.NetAdapter.Status -ne "Disconnected"}).IPv4Address.IPAddress.split()[0]
docker pull mcr.microsoft.com/cosmosdb/linux/azure-cosmos-emulator
docker run -p 8081:8081 -p 10251:10251 -p 10252:10252 -p 10253:10253 -p 10254:10254  -m 3g --cpus=2.0 --name=test-linux-emulator -e AZURE_COSMOS_EMULATOR_PARTITION_COUNT=10 -e AZURE_COSMOS_EMULATOR_ENABLE_DATA_PERSISTENCE=true -e AZURE_COSMOS_EMULATOR_IP_ADDRESS_OVERRIDE=$ipaddr -it mcr.microsoft.com/cosmosdb/linux/azure-cosmos-emulator
$ipaddr = (Get-NetIPConfiguration | Where-Object {$_.IPv4DefaultGateway -ne $null -and $_.NetAdapter.Status -ne "Disconnected"}).IPv4Address.IPAddress.split()[0]
$certFileLocation = "C:\Development\CosmosDB\emulator.crt"
curl -k https://$($ipaddr):8081/_explorer/emulator.pem > $($certFileLocation)

$cert = New-Object System.Security.Cryptography.X509Certificates.X509Certificate2 $($certFileLocation)
$thumbprint = $cert.Thumbprint
$certStore = "cert:\LocalMachine\Root"
Import-Certificate -FilePath $($certFileLocation) -CertStoreLocation $($certStore)
$certPath = $($certStore) + "\" + $($thumbprint)
(Get-ChildItem -Path $($certPath)).FriendlyName='CosmosDB Emulator Test'